MikroTik Bridge Configuration
The MikroTik bridge feature is a powerful tool that allows you to connect multiple Layer 2 interfaces, such as Ethernet and wireless, into a single logical network. This is useful for simplifying network design, enabling communication between devices on different interfaces, and implementing VLANs. In this guide, we will explain what a bridge is, why it is useful, and provide step-by-step instructions on how to do MikroTik bridge configuration.
Table of Contents
What is a Bridge on MikroTik?
A bridge in MikroTik is a virtual switch that connects multiple physical interfaces at Layer 2 (Data Link Layer). When interfaces are added to a bridge, they all act as part of the same broadcast domain, enabling seamless communication between connected devices without a router.
A bridge connects multiple interfaces into a single virtual interface to unify network segments, typically within the same subnet.
A VLAN, on the other hand, logically separates traffic within the same physical network by tagging data packets with a VLAN ID, allowing for network segmentation without requiring separate hardware. Bridges and VLANs can work together, where a bridge manages physical ports and VLAN filtering enables logical segmentation. For example, bridging Ethernet ports and wireless interfaces allows you to create a unified network where wired and wireless devices share the same subnet and communicate directly.
Benefits of Using Bridges
- Simplified Network Design: Combine multiple interfaces into a single logical network.
- Seamless Device Communication: Devices in the same bridge communicate as if they are on the same physical switch.
- VLAN Support: Easily implement VLANs for segmentation and security.
- Flexibility: Bridge both wired and wireless interfaces.
Basic Bridge Configuration
Follow these steps to configure a basic bridge on MikroTik:
Step 1: Create the Bridge
Use the following command to create a new bridge:
/interface/bridge/add name=bridge1Step 2: Add Ports to the Bridge
Add the desired interfaces (e.g., Ethernet ports) to the bridge:
/interface/bridge/port/add bridge=bridge1 interface=ether1
/interface/bridge/port/add bridge=bridge1 interface=ether2
Step 3: Assign an IP Address (Optional)
If the bridge needs an IP address, assign it as follows:
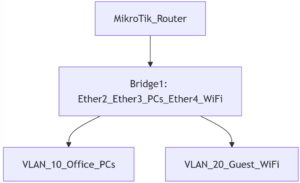
/ip/address/add address=192.168.88.1/24 interface=bridge1Bridge Configuration with VLANs
To implement VLANs using a MikroTik bridge, follow these steps:
Step 1: Create a Bridge
As in the basic configuration, create a bridge:
/interface/bridge/add name=bridge1 vlan-filtering=yesStep 2: Add VLANs
Define VLAN interfaces and assign them to the bridge:
/interface/vlan/add name=vlan10 vlan-id=10 interface=bridge1
/interface/vlan/add name=vlan20 vlan-id=20 interface=bridge1
Step 3: Assign VLAN Ports
Tag or untag ports on the bridge for VLAN use:
/interface/bridge/vlan/add bridge=bridge1 tagged=ether1 untagged=ether2 vlan-ids=10
/interface/bridge/vlan/add bridge=bridge1 tagged=ether1 untagged=ether3 vlan-ids=20
Troubleshooting Bridge Configurations
Here are some tips to resolve common issues:
- Bridge Not Forwarding Traffic: Ensure all required ports are added to the bridge.
- VLAN Traffic Issues: Verify VLAN filtering and port tagging configurations.
- Performance Problems: Check CPU usage, as bridging can be CPU-intensive on low-end devices.
Conclusion
MikroTik bridges are an essential tool for designing efficient and flexible networks. Whether you need a simple bridge for connecting interfaces or a more complex setup with VLANs, MikroTik provides the features you need. By following this guide, you can configure bridges effectively and troubleshoot any issues that arise.
Explore more MikroTik tutorials on our blog to enhance your networking skills!