MikroTik Safe Mode for Remote Network Changes
Picture this: You’re managing a MikroTik router 200 miles away. You make what seems like a simple firewall rule change, press Enter, and suddenly—your connection drops. Your heart sinks as you realize you’ve just locked yourself out of a remote device. The phone starts ringing with complaints about network downtime, and you’re facing either an expensive emergency site visit or hours of frustrated troubleshooting.
This nightmare scenario happens more often than most network administrators care to admit. But here’s the good news: MikroTik Safe Mode exists specifically to prevent these disasters.
Safe Mode is RouterOS’s built-in safety mechanism that automatically rolls back your configuration changes if you lose connectivity to the device. Think of it as an “undo” button that activates automatically when things go wrong—a lifeline for anyone managing MikroTik devices remotely.
In this comprehensive guide, you’ll learn everything you need to know about MikroTik Safe Mode, including:
- How Safe Mode works and when to use it
- Step-by-step instructions for enabling Safe Mode in Winbox, Terminal, and WebFig
- Best practices and pro tips from experienced network engineers
- Real-world scenarios where Safe Mode saves the day
- Common pitfalls and how to avoid them
Whether you’re a seasoned MikroTik professional or just starting your RouterOS journey, mastering Safe Mode is essential for confident, stress-free remote network management.
What Is MikroTik Safe Mode and How Does It Work?
Core Concept
MikroTik Safe Mode is a session-based configuration protection feature built into RouterOS that creates a temporary safety net for your changes. When you enable Safe Mode before making configuration modifications, RouterOS monitors your connection to the device. If that connection is lost for any reason, the router automatically rolls back any changes you made during that Safe Mode session.
The beauty of Safe Mode lies in its simplicity. Unlike creating manual backups and restore points, Safe Mode works automatically in the background. You don’t need to specify what to back up or remember complex restoration procedures. RouterOS handles everything for you.
Here’s what makes Safe Mode different from traditional backup and restore methods:
- Automatic activation: No need to manually restore configurations
- Session-based: Only rolls back changes made during the current Safe Mode session
- Connection-dependent: Monitors your active connection as the trigger
- Instant rollback: Changes revert within seconds of connection loss
- No storage required: Doesn’t create backup files; keeps changes in temporary memory
When Safe Mode Activates
Understanding when and how Safe Mode triggers is crucial for using it effectively. Safe Mode automatically rolls back your changes in three specific scenarios:
1. Connection Loss
If your connection to the MikroTik device drops—whether due to a configuration error, network interruption, or mistaken change—Safe Mode immediately detects the loss and begins the rollback process. This typically completes within 5-10 seconds of connection loss.
2. Manual Cancellation
You can manually cancel Safe Mode without committing changes by pressing Ctrl+X a second time (or typing the appropriate command in Terminal). This is useful if you realize you’ve made an error and want to abort the changes before they cause problems.
3. Session Timeout
If your session remains idle for an extended period (default timeout varies by connection method), RouterOS may terminate the session, triggering a Safe Mode rollback. This prevents abandoned sessions from leaving uncommitted changes in limbo.
Visual Indicators of Safe Mode
Knowing whether Safe Mode is active is essential. Each RouterOS management interface provides clear visual feedback:
Winbox Interface:
When Safe Mode is active in Winbox, you’ll see a prominent [Safe Mode] indicator in the window title bar. The status bar at the bottom of the window also displays “SAFE MODE ACTIVE” in capital letters. These indicators are impossible to miss—which is exactly the point.
Terminal/SSH:
In command-line interfaces, Safe Mode changes your prompt. Instead of the standard [admin@MikroTik] >, you’ll see [admin@MikroTik] <SAFE>. The <SAFE> tag appears before every command prompt while Safe Mode is active.
WebFig Interface:
WebFig displays a yellow or orange banner across the top of the page indicating “Safe Mode Active” when you’ve enabled the feature. The banner remains visible on all pages until you exit Safe Mode.
These visual cues serve as constant reminders that you’re working with a safety net, encouraging more confident configuration changes while keeping you aware of the uncommitted state.
The Critical Importance of Safe Mode for Remote MikroTik Management
Every network administrator who manages remote MikroTik devices will eventually face a situation where Safe Mode becomes the difference between a minor hiccup and a major disaster. Let’s explore the specific scenarios where Safe Mode for remote network changes proves invaluable.
Common Scenarios Where Safe Mode Saves the Day
Firewall Rule Modifications
Firewall configuration is perhaps the most dangerous area for remote changes. A single misplaced rule can block your management access instantly. Whether you’re adding new security rules, reorganizing rule order, or modifying existing filters, one wrong move can lock you out. Safe Mode ensures that if your new firewall configuration blocks your own access, the changes automatically revert, restoring your connection.
IP Address Changes
Modifying IP addresses on interfaces is a classic way to lose remote access. Maybe you’re renumbering a subnet, changing the management interface IP, or updating NAT configurations. Without Safe Mode, a typo in an IP address or subnet mask can mean immediate lockout. With Safe Mode enabled, you can make the change, test connectivity from your end, and only commit when you’re certain everything works correctly.
Routing Configuration Updates
Changes to routing tables, default gateways, or routing protocols can inadvertently break your connection path to the device. Safe Mode protects you while you modify static routes, adjust OSPF or BGP configurations, or change route preferences. If your routing change breaks connectivity, Safe Mode automatically restores the working configuration.
Wireless Settings Adjustments
When managing wireless access points or bridges remotely over a wireless connection, configuration changes are particularly risky. Modifying wireless security settings, changing SSIDs, or adjusting frequencies can instantly disconnect you. Safe Mode provides a safety net for these high-risk wireless configurations.
Bridge Configuration Changes
Bridge configurations often involve complex interactions between interfaces. Adding or removing bridge ports, changing STP settings, or modifying VLAN filtering can have unexpected effects on connectivity. Safe Mode allows you to experiment with bridge configurations knowing you can automatically roll back if something goes wrong.
The True Cost of Being Locked Out
Understanding what’s at stake when you lose remote access helps emphasize why Safe Mode is non-negotiable for professional network management:
- Downtime costs: Every minute of network outage can mean lost revenue, especially for business-critical infrastructure
- Emergency site visits: Sending a technician to a remote location can cost hundreds or thousands of dollars, plus travel time
- SLA violations: Service Level Agreement penalties can quickly add up when network services are unavailable
- Reputation damage: Client confidence erodes with each avoidable outage
- Opportunity cost: Hours spent troubleshooting could be invested in productive projects
Real-World Example
Consider a managed service provider supporting a retail chain with MikroTik routers in 50 locations. During a routine security update, a technician needs to modify firewall rules across all sites. Without Safe Mode, a single configuration error could potentially lock them out of multiple remote locations simultaneously, requiring expensive truck rolls to each site.
With Safe Mode enabled, that same technician can confidently make changes to each location. If a firewall rule error occurs, the configuration automatically rolls back within seconds, allowing immediate correction without any downtime or emergency site visits. The cost savings from preventing just one unnecessary site visit often justify adopting Safe Mode as standard practice.
Safe Mode isn’t just about convenience—it’s about professional responsibility, cost control, and maintaining the high availability that modern networks demand.
Step-by-Step Guide: Enabling Safe Mode in MikroTik RouterOS
Now that you understand what Safe Mode is and why it’s essential, let’s walk through the practical steps of enabling and using it across different RouterOS management interfaces. The process is straightforward, but the details matter.
Enabling Safe Mode in Winbox
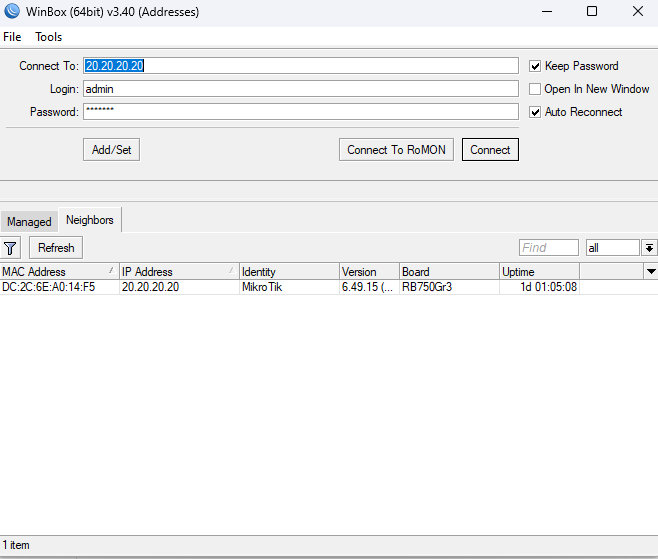
Winbox is the most popular MikroTik management tool, and enabling Safe Mode couldn’t be easier:
- Connect to your MikroTik device using Winbox as you normally would
- Press Ctrl+X on your keyboard (or click the “Safe Mode” button in the menu bar if available in your Winbox version)
- Observe the visual confirmation: The window title bar will now display [Safe Mode] and the status bar at the bottom will show “SAFE MODE ACTIVE”
- Make your configuration changes as needed
- Test your changes thoroughly to ensure connectivity remains stable
- Press Ctrl+X again to exit Safe Mode and commit your changes permanently
Important Note: If you accidentally close the Winbox window while in Safe Mode, this counts as a connection loss, and your changes will be rolled back automatically. Always exit Safe Mode properly by pressing Ctrl+X before closing the window.
Enabling Safe Mode in Terminal/SSH
When managing MikroTik devices via SSH or serial console, Safe Mode works slightly differently but just as effectively:
- Connect to your device via SSH or Telnet:
ssh admin@192.168.88.1 - Press Ctrl+X at any command prompt
- Watch for the prompt change: Your prompt will change from
[admin@MikroTik] >to[admin@MikroTik] <SAFE> - Execute your configuration commands normally
- Verify connectivity by testing access from another device or keeping a secondary connection open
- Press Ctrl+X again to commit changes and exit Safe Mode—your prompt returns to normal
Example Terminal Session:
[admin@MikroTik] > (Press Ctrl+X here)
[admin@MikroTik] <SAFE> /ip address print
Flags: X - disabled, I - invalid, D - dynamic
 #   ADDRESS            NETWORK         INTERFACE
 0   192.168.88.1/24    192.168.88.0    ether1
 1   10.0.0.1/30        10.0.0.0        ether2

[admin@MikroTik] <SAFE> /ip firewall filter add chain=input action=drop
[admin@MikroTik] <SAFE> (Verify connection still works)
[admin@MikroTik] <SAFE> (Press Ctrl+X to commit)
[admin@MikroTik] >
Pro Tip: In scripting contexts, you cannot use Safe Mode directly. However, you can structure scripts with rollback timers using scheduled tasks—we’ll cover this in the alternatives section.
Enabling Safe Mode in WebFig
WebFig, the web-based management interface, also supports Safe Mode:
- Log into WebFig by navigating to
http://your-mikrotik-ipin your browser - Look for the Safe Mode toggle in the top navigation bar (usually near the top-right corner)
- Click “Enable Safe Mode” or the Safe Mode button
- Confirm the yellow/orange banner appears indicating “Safe Mode Active”
- Make your configuration changes through the web interface
- Test thoroughly before committing
- Click “Disable Safe Mode” to commit your changes
WebFig Consideration: Some administrators find WebFig’s Safe Mode implementation less intuitive than Winbox or Terminal. The interface can sometimes refresh or navigate between pages, making it less clear whether Safe Mode remains active. Always verify the banner is visible before assuming Safe Mode protection.
Making Changes Safely in Safe Mode
Once Safe Mode is enabled, follow these guidelines for maximum safety:
Test Before Committing:
After making each significant change, actively test your connectivity. Open a new connection to the device, run ping tests, or verify that critical services remain accessible. Don’t just assume everything works—prove it before committing.
Keep the Session Active:
Avoid letting your Safe Mode session sit idle for extended periods. Some connection methods have timeouts that can trigger unintended rollbacks. If you need to step away, exit Safe Mode first, then re-enable it when you return.
Have a Secondary Connection Method:
Whenever possible, maintain a backup connection to the device through a different path. For example, if you’re connected via the WAN interface, also maintain access through a VPN or secondary management interface. This allows you to verify connectivity even if your primary path fails.
Properly Exiting Safe Mode
Exiting Safe Mode correctly is just as important as enabling it:
To Commit Changes (Normal Exit):
- Press Ctrl+X a second time in Winbox or Terminal
- Click “Disable Safe Mode” in WebFig
- Verify all visual indicators disappear
- Your changes are now permanent
To Abort Changes:
- Simply close your connection or wait for timeout
- Changes will automatically roll back
- Reconnect to verify the rollback completed successfully
Verification After Exiting:
After committing changes by exiting Safe Mode, take a moment to verify your configurations are actually active and working as intended. Check that your firewall rules are in place, IP addresses are correctly assigned, and all services respond normally. This final verification step ensures your changes accomplished what you intended.
MikroTik Safe Mode Best Practices: Expert Tips for Remote Configuration
Using Safe Mode effectively goes beyond simply knowing how to enable it. Professional network engineers follow specific workflows and practices to maximize safety and minimize risks when making remote MikroTik configuration changes. Here are the battle-tested best practices that separate confident administrators from those who live in constant fear of lockouts.
Pre-Change Checklist
Before you even connect to a remote MikroTik device, run through this essential checklist:
1. Create a Current Backup
Always export your current configuration before making changes. While Safe Mode protects your session, having a backup provides an additional safety layer for unforeseen circumstances:
/system backup save name=pre-change-backup
/export file=pre-change-config
Download these files to your local machine immediately. If something goes catastrophically wrong, you’ll have a known-good configuration to restore.
2. Document the Current State
Take screenshots or notes of current settings, especially for complex configurations. Document:
- Current IP addresses and routes
- Active firewall rules and their order
- Interface states and assignments
- Any custom configurations specific to this device
3. Establish Multiple Access Paths
Never rely on a single connection method to a remote device. Before making changes, verify you have:
- Primary management access (usually LAN-side)
- Secondary access through different interface (WAN, VPN, or wireless)
- Out-of-band access if available (LTE modem, management VLAN)
- Phone number for on-site contact if all else fails
4. Choose Low-Impact Timing
Schedule configuration changes during maintenance windows or low-traffic periods. Even with Safe Mode, brief connectivity interruptions can occur during testing. The ideal time is when:
- Network usage is minimal
- Users won’t be impacted by brief disruptions
- Support staff are available if needed
- You’re not rushed or under pressure
During Changes: Professional Workflow
Make One Change at a Time
This is perhaps the most important rule. Even with Safe Mode enabled, making multiple simultaneous changes creates confusion. If something goes wrong, you won’t know which specific change caused the problem. The professional approach:
- Enable Safe Mode
- Make a single, specific change
- Test thoroughly
- Verify connectivity from multiple paths
- Commit by exiting Safe Mode (Ctrl+X)
- Repeat for the next change
Yes, this takes longer. But the few extra minutes invested in methodical changes save hours of troubleshooting when something goes wrong.
Test After Every Change
Don’t just make a change and hope it works. Actively verify:
- Primary access: Can you still manage the device through your main connection?
- Secondary access: Verify backup connection paths still work
- Client connectivity: Check that end users aren’t impacted
- Service functionality: Verify the services you’re modifying work correctly
Keep Sessions Active and Engaged
Don’t enable Safe Mode and then leave your computer for lunch. Active session management includes:
- Periodically sending commands or clicking in the interface to prevent timeouts
- Monitoring connection quality throughout the change process
- Being prepared to quickly abort if connectivity becomes unstable
- Watching for performance indicators that might suggest problems
Configure Secondary Access Before Touching Primary
If you need to modify your primary management interface or connection path, always configure an alternative first:
- Add a secondary management IP on a different interface
- Verify you can connect through this secondary path
- Then—and only then—make changes to the primary path
- Keep the secondary connection open in another window while modifying primary
Advanced Safe Mode Techniques
Using Safe Mode with Multiple Sessions
Professional tip: Open two simultaneous connections to the device—one in Safe Mode for making changes, and one in normal mode for monitoring and emergency access. This provides:
- A monitoring window to observe system behavior
- Emergency access if your Safe Mode session has issues
- Ability to run verification commands without interfering with Safe Mode
Safe Mode with Critical Infrastructure Changes
For particularly risky changes (like modifying bridge configurations or core routing), use this enhanced safety procedure:
- Take a full backup
- Enable Safe Mode
- Make the first part of your change
- Test extensively (5-10 minutes of monitoring)
- If stable, commit by exiting Safe Mode
- Take another backup of the intermediate state
- Re-enable Safe Mode for the next change phase
This staged approach ensures you never move too far from a known-good configuration.
Documentation During Changes
Keep notes as you work. A simple text file documenting each change helps if you need to troubleshoot later:
14:30 - Enabled Safe Mode
14:32 - Added firewall rule: drop invalid input packets
14:35 - Tested - all services functional
14:36 - Committed change (exited Safe Mode)
14:38 - Enabled Safe Mode again
14:40 - Modified IP address on ether2 from 10.0.0.1 to 10.0.1.1
14:42 - Tested - connectivity maintained via ether1
14:43 - Committed change
Common Pitfalls to Avoid
Assuming Safe Mode Protects Everything
Safe Mode only rolls back changes that affect your connection to the device. Changes that don’t impact connectivity won’t trigger a rollback. For example, modifying a DHCP server configuration or changing QoS rules might not affect your management access, so Safe Mode won’t save you if those changes are incorrect.
Not Testing Before Committing
The most common mistake is enabling Safe Mode, making a change, and immediately exiting Safe Mode without proper testing. Safe Mode’s value comes from thorough testing while protected. Take the time to verify everything works before committing.
Making Too Many Changes at Once
We mentioned this earlier, but it bears repeating: bundling multiple changes in a single Safe Mode session makes troubleshooting nearly impossible. If you exit Safe Mode and later discover a problem, you won’t know which of the ten changes you made caused it.
Forgetting About Session Timeouts
Different connection methods have different timeout behaviors. SSH sessions might timeout after 30 minutes of inactivity. Winbox connections might be more forgiving. Know your timeout limits and work within them, or configure keep-alive settings appropriately.
Overconfidence from Safe Mode
Safe Mode is a safety net, not a license for recklessness. Some administrators become cavalier about changes because “Safe Mode will save me.” This mindset leads to sloppy practices and eventually a situation where Safe Mode can’t help (like making changes that don’t affect connectivity but break critical services).
By following these best practices, you transform Safe Mode from a simple feature into a comprehensive safety system for professional remote network management.
Understanding MikroTik Safe Mode Limitations: What It Can’t Save You From
While Safe Mode is incredibly valuable, understanding its limitations is just as important as knowing its capabilities. Safe Mode is not a magic solution that protects against every possible configuration mistake. Experienced MikroTik administrators understand exactly where Safe Mode helps—and where it doesn’t.
What Safe Mode Cannot Protect Against
Hardware Failures
Safe Mode exists entirely in software. If the router experiences a hardware failure—power supply death, failed storage, overheating, or component malfunction—Safe Mode cannot help. The rollback mechanism requires functioning hardware to execute.
This means Safe Mode won’t save you from:
- Power outages at the remote site
- Failed network interface cards
- Storage corruption that prevents configuration loading
- Physical damage to the device
Changes That Don’t Affect Your Connectivity
Safe Mode’s rollback mechanism triggers only when your connection to the device is lost. If you make configuration changes that break functionality but don’t disconnect you, Safe Mode won’t automatically roll back.
Examples include:
- Misconfigured DHCP server (you stay connected, but clients can’t get IPs)
- Broken NAT rules (you have access, but users can’t reach the internet)
- Incorrect QoS configuration (connectivity works, but performance suffers)
- VPN configuration errors (your management access works, but VPN clients fail)
- DNS configuration mistakes (connectivity intact, but name resolution broken)
In these scenarios, you’ll need to manually identify and correct the problems. Safe Mode provides no automatic protection.
Multiple Connection Paths
Safe Mode monitors your active session’s connection. If you’re connected through one path but break connectivity through a different path, Safe Mode won’t necessarily detect the problem.
For instance, if you’re managing the router via a LAN connection but accidentally break the WAN firewall rules, your LAN connection remains active. Safe Mode won’t rollback because from its perspective, everything is fine—even though remote WAN access is now broken.
Power Loss on the Router
If the router loses power while you’re in Safe Mode, your uncommitted changes are lost—but not rolled back in the traditional sense. When power returns and the router reboots, it loads the last saved configuration, effectively achieving the same result as a rollback. However, this isn’t Safe Mode working as designed; it’s simply the router returning to its last known state after power restoration.
The distinction matters because:
- You experience downtime during the power outage and reboot
- You might not immediately realize your changes were lost
- Any other unsaved changes (from other sessions) are also lost
BGP and Dynamic Routing Protocol Considerations
Safe Mode works well with static configurations, but dynamic routing protocols introduce complexity. If you modify BGP or OSPF settings in Safe Mode, the rollback might not cleanly restore routing states because:
- Routing protocol convergence takes time
- Neighbor relationships might have changed
- Route propagation to peers has already occurred
- The routing protocol state machine may be in a different position
While Safe Mode will restore your configuration, the routing protocol’s operational state might not immediately return to the pre-change condition. Full convergence could take additional time.
Switch Chip Configurations
MikroTik devices with switch chips (like the CRS series) have certain configurations that apply at the hardware switching level. Changes to switch chip configurations might behave differently with Safe Mode because these settings interact with hardware offloading features.
Specifically:
- Some switch chip settings require reboot to fully apply or rollback
- Hardware offloaded features might not rollback as cleanly as pure software configurations
- VLAN filtering and switch rules might have timing considerations
Certain System-Level Changes
Some system-level modifications fall outside Safe Mode’s protection scope:
- RouterOS upgrades: Safe Mode doesn’t protect against upgrade-related issues
- License changes: Licensing operations aren’t covered by Safe Mode
- User database modifications: While you can roll back user changes, if you lock yourself out due to password changes before enabling Safe Mode, you’re stuck
- System identity changes: These typically don’t affect connectivity, so Safe Mode won’t automatically rollback
Understanding Safe Mode’s Scope
The key to understanding Safe Mode’s limitations is recognizing its fundamental design: Safe Mode protects against changes that break your active management connection.
This means Safe Mode is excellent for:
- IP address modifications
- Firewall rule changes that might block management
- Interface configurations affecting connectivity
- Routing changes that might break the path to the router
- Bridge configurations that affect your connection path
But Safe Mode provides no protection for:
- Changes that don’t affect your connection
- Hardware failures
- Power-related issues
- Changes to services you’re not currently using for management
This is why Safe Mode should be part of a comprehensive safety strategy—not the only safety measure you employ. Professional network management requires multiple layers of protection, including backups, change management procedures, testing protocols, and monitoring systems.
Understanding these limitations doesn’t diminish Safe Mode’s value. Rather, it helps you use the feature appropriately and recognize when additional safety measures are necessary.
Beyond Safe Mode: Additional MikroTik Remote Management Safety Tools
While MikroTik Safe Mode is an excellent first line of defense, professional network management requires a multi-layered approach to safety. Smart administrators combine Safe Mode with other protective mechanisms to create a comprehensive safety net for remote configuration changes.
RouterOS Built-in Safety Features
Scheduled Script Rollbacks
One powerful technique involves using RouterOS’s scheduler to create automatic rollback timers. This is particularly useful when Safe Mode isn’t available (like when running scripts) or when you want an additional layer of protection.
Here’s how it works:
# Create a backup of current config
/system backup save name=safety-backup

# Schedule a restore in 10 minutes
/system scheduler add name=safety-rollback start-time=00:10:00 \
    interval=0 on-event="/system backup load name=safety-backup"

# Make your changes...
# If everything works, remove the scheduled rollback:
/system scheduler remove safety-rollback
This creates a 10-minute window to test your changes. If you verify everything works correctly, you remove the scheduled rollback. If you lose connectivity or something goes wrong, the router automatically restores the backup after 10 minutes.
Script-Based Safety Mechanisms
For more sophisticated safety, you can create scripts that make changes, test connectivity, and roll back if tests fail:
# Save current config
/export file=pre-change-backup

# Make the change
/ip firewall filter add chain=input action=drop src-address=192.168.1.100

# Test connectivity (this would be more sophisticated in practice)
:delay 5s

# If we're still connected and can run this command, commit
# Otherwise, the scheduler we created earlier will rollback
:log info "Change successful, removing safety rollback"
/system scheduler remove safety-rollback
Netinstall for Emergency Recovery
Netinstall is MikroTik’s network-based installation and recovery tool. While not a preventive measure like Safe Mode, Netinstall can recover devices even when they’re completely misconfigured:
- Works with devices in a bricked or inaccessible state
- Can reinstall RouterOS from scratch
- Requires physical access or special boot server setup
- Ultimate recovery option when all else fails
For critical remote sites, some administrators pre-configure Netinstall boot servers on the local network, enabling remote recovery even after catastrophic configuration failures.
Reset Button Configuration
MikroTik devices have a hardware reset button that can be configured for various reset behaviors. For remote sites with on-site staff (but not network experts), you can configure the reset button to:
- Load a specific backup configuration after 10 seconds pressed
- Reset to a known-good state rather than factory defaults
- Enable a temporary access method for remote troubleshooting
Configuration example:
/system routerboard settings set boot-device=try-ethernet-once-then-nand
/system backup save name=known-good-config
# Configure reset button to load this backup
Out-of-Band Management
LTE Backup Connectivity
One of the best investments for critical remote sites is a secondary connection path that’s completely independent of the main configuration. An LTE modem provides:
- Management access even when main WAN is misconfigured
- Separate interface unlikely to be affected by most config changes
- Emergency access for recovery operations
- Monitoring and alert capabilities when main network fails
Professional configuration includes:
- Dedicated management VLAN or interface for LTE access
- Firewall rules protecting LTE management access
- Monitoring to alert when primary connection fails
- Documentation for emergency access procedures
Separate Management Network
Larger deployments often implement completely separate management networks:
- Dedicated physical or VLAN-based management network
- Isolated from production changes
- Separate routing and firewall rules
- Always-available access regardless of production network state
Change Management and Documentation
Configuration Version Control
Professional network management includes tracking configuration changes over time:
- Regular automated exports of router configurations
- Storage in version control systems (Git, SVN, etc.)
- Documentation of what changed, when, and why
- Easy comparison between current and previous configurations
- Ability to identify exactly when a problem was introduced
Simple implementation:
# Create daily backup script
/system scheduler add name=daily-backup interval=1d \
    on-event="/system backup save name=(\"backup-\" . \
    [:pick [/system clock get date] 7 11] . [:pick [/system clock get date] 0 3] . \
    [:pick [/system clock get date] 4 6]); \
    /export file=(\"config-\" . [:pick [/system clock get date] 7 11] . \
    [:pick [/system clock get date] 0 3] . [:pick [/system clock get date] 4 6])"
Pre-Change Testing in Lab Environment
Before making changes to production routers, test in a lab environment:
- Maintain a lab router with similar configuration
- Test complex changes in the lab first
- Document the exact steps that worked
- Apply those tested steps to production
This is especially important for major changes like RouterOS upgrades, complex routing modifications, or significant architecture changes.
Monitoring and Alerting
The Dude for Network Monitoring
MikroTik’s The Dude provides excellent monitoring capabilities:
- Real-time device availability monitoring
- Alerts when devices become unreachable
- Performance metrics tracking
- Automated mapping of network topology
When making remote changes, The Dude can alert you immediately if connectivity is lost, even before you realize your change caused a problem.
SNMP Monitoring
Integrate MikroTik devices into enterprise monitoring systems:
- Configure SNMP on MikroTik devices
- Monitor via tools like Zabbix, Nagios, PRTG, or LibreNMS
- Set up alerts for connectivity loss
- Track performance metrics and interface states
Email Alerts on Connection Loss
Configure email alerts for critical events:
# Configure email settings first
/tool e-mail set server=smtp.example.com from=router@example.com

# Create script to send alert on specific events
/system script add name=connection-lost-alert source={
    /tool e-mail send to=admin@example.com \
    subject="Router Alert: Connection Lost" \
    body="Primary WAN connection lost - please investigate"
}

# Trigger on netwatch failure
/tool netwatch add host=8.8.8.8 interval=30s \
    down-script=connection-lost-alert
Creating a Comprehensive Safety Strategy
The most effective approach combines multiple safety layers:
- Pre-change: Take backups, document current state, plan changes
- During change: Use Safe Mode for connection-affecting modifications
- Post-change: Monitor for issues, verify functionality, update documentation
- Always available: Out-of-band access, monitoring, alerting
- Recovery ready: Known-good backups, recovery procedures documented
No single tool—not even Safe Mode—provides complete protection. But by combining multiple safety mechanisms, you create a resilient system that can handle almost any configuration challenge safely and professionally.
Troubleshooting Common MikroTik Safe Mode Problems
Even though Safe Mode is a relatively straightforward feature, administrators occasionally encounter issues with its operation. Understanding how to diagnose and resolve these problems ensures Safe Mode remains a reliable safety tool in your network management arsenal.
Safe Mode Not Activating
Symptom: You press Ctrl+X but don’t see the Safe Mode indicators appear.
Possible Causes and Solutions:
1. Keyboard Shortcut Conflict
Some terminal emulators or SSH clients intercept Ctrl+X before it reaches the router. Try:
- Using a different SSH client (PuTTY, KiTTY, or built-in terminal)
- Checking your terminal emulator’s keyboard mapping settings
- In Winbox, click the Safe Mode button in the menu if available instead of using keyboard shortcut
2. Connection Type Limitation
Verify Safe Mode is supported on your connection type:
- Safe Mode works fully in Winbox, SSH, and Telnet
- WebFig support varies by RouterOS version—check for the Safe Mode toggle
- API connections have limited or no Safe Mode support
- Serial console connections fully support Safe Mode
3. RouterOS Version
Very old RouterOS versions might have limited Safe Mode functionality. Update to a current stable release if possible.
4. Insufficient Permissions
Some user permission levels might restrict Safe Mode access. Verify you’re logged in with full administrative privileges.
Changes Not Rolling Back as Expected
Symptom: You lose connection while in Safe Mode, but your changes don’t roll back, and the misconfiguration persists.
Possible Causes and Solutions:
1. Changes Were Already Committed
Double-check whether you accidentally exited Safe Mode (pressed Ctrl+X twice) before losing connection. Once you exit Safe Mode normally, changes are committed and permanent. Safe Mode only protects uncommitted changes.
2. Multiple Simultaneous Sessions
If multiple administrators are connected simultaneously:
- Each session has independent Safe Mode status
- Changes made in one session’s Safe Mode don’t affect other sessions
- If someone else committed similar changes in a different session, your Safe Mode rollback won’t affect their committed changes
Solution: Implement change control procedures to prevent multiple simultaneous configuration changes.
3. Change Scope Outside Safe Mode Protection
Remember that Safe Mode only rolls back changes that would affect your connection. If you made changes that broke other functionality without disconnecting you, Safe Mode has no reason to rollback.
4. Router Rebooted
If the router rebooted while you were in Safe Mode (power loss, crash, manual reboot), it loads the last saved configuration. Your Safe Mode changes are lost, but this isn’t technically a Safe Mode rollback—it’s a boot from saved config.
Session Timeout Issues
Symptom: Your Safe Mode session times out unexpectedly, rolling back changes you wanted to keep.
Possible Causes and Solutions:
1. Idle Timeout
SSH and Telnet sessions have idle timeouts. Configure keep-alive settings:
# On the MikroTik router
/ip ssh set strong-crypto=yes always-allow-password-login=yes

# In your SSH client (example for OpenSSH)
# Add to ~/.ssh/config:
Host mikrotik-router
    ServerAliveInterval 60
    ServerAliveCountMax 3
2. Network Instability
Intermittent connectivity issues can cause session drops. If managing over unstable connections:
- Make smaller, more frequent changes with individual Safe Mode sessions
- Use a more reliable connection path when possible
- Consider scheduled script rollbacks instead of relying on Safe Mode
3. Firewall State Timeout
Stateful firewall rules on intermediate devices might timeout your connection. Ensure firewall rules allow established connections to remain open:
- Check connection tracking timeout settings
- Configure appropriate timeout values for management connections
- Send periodic keep-alive traffic
Safe Mode in Scripting Contexts
Symptom: You want to use Safe Mode within scripts, but it doesn’t work as expected.
Explanation:
Safe Mode is session-based and doesn’t work directly in automated scripts because scripts don’t have an interactive session that can be monitored. Scripts run to completion without maintaining a connection that Safe Mode can monitor.
Solution:
Use scheduled rollback mechanisms instead:
# At start of script - create safety rollback
/system backup save name=script-safety-backup
/system scheduler add name=script-safety-rollback \
    start-time=00:05:00 interval=0 \
    on-event="/system backup load name=script-safety-backup"

# Make your changes
/ip firewall filter add chain=input action=accept protocol=tcp dst-port=8080

# At end of script - if we got here, changes worked
:delay 10s
/system scheduler remove script-safety-rollback
:log info "Script completed successfully, safety rollback removed"
Multiple Administrator Session Conflicts
Symptom: Strange behavior when multiple administrators work on the same router simultaneously.
Understanding the Issue:
Each connection session maintains its own Safe Mode status independently:
- Admin A can be in Safe Mode while Admin B is not
- Admin A’s Safe Mode rollback only affects changes made in Admin A’s session
- If Admin B commits a similar change in normal mode, Admin A’s rollback won’t affect it
Solutions:
- Implement change control procedures: only one administrator modifies configuration at a time
- Use the user tracking features to see who else is connected:
/user active print - Communicate with other administrators before making changes
- Use the system log to track changes:
/log print where topics~"system"
Wireless Connection Stability in Safe Mode
Symptom: Managing a MikroTik device over wireless, and Safe Mode keeps triggering rollbacks due to connection instability.
Challenges:
Wireless connections are inherently less stable than wired connections:
- Brief signal drops can disconnect your session
- Making changes to wireless settings while connected wirelessly is particularly risky
- Environmental interference can cause unexpected disconnections
Best Practices:
- Avoid managing devices wirelessly when possible—use wired connections
- If you must use wireless, ensure strong signal before making changes
- Never modify wireless settings while connected via wireless
- Consider using scheduled script rollbacks instead of Safe Mode for wireless-connected management
- Set up wired out-of-band access for recovery
WebFig Safe Mode Issues
Symptom: Confusion about whether Safe Mode is active in WebFig, or changes behaving unexpectedly.
Common Issues:
1. Visual Indicators Not Clear
WebFig’s Safe Mode indication can be less obvious than Winbox or Terminal:
- Always verify the Safe Mode banner is visible at the top of the page
- Page refreshes or navigation might make the indicator temporarily disappear
- Check Safe Mode status before committing changes
2. Browser Sessions and Cookies
Web-based management depends on browser sessions:
- If your browser crashes or closes, you lose your Safe Mode session
- Some browser security settings might interfere with session persistence
- Consider using Winbox or SSH for critical changes instead of WebFig
3. Page Refresh Behavior
Some administrators report unexpected behavior with page refreshes in WebFig while in Safe Mode. To minimize issues:
- Avoid refreshing pages while in Safe Mode when possible
- Verify Safe Mode status after any page navigation
- Complete changes in a single page session when practical
Verification and Testing
When troubleshooting Safe Mode issues, systematic testing helps identify the problem:
- Test Safe Mode in ideal conditions: Wired connection, Winbox, no other sessions
- Verify basic functionality: Enable Safe Mode, make a harmless change, verify indicator appears
- Test rollback mechanism: Make a change, disconnect intentionally, verify rollback occurs
- Test in actual conditions: Replicate your usual connection method and workflow
- Document behavior: Keep notes on what works and what doesn’t
If Safe Mode consistently fails to work as expected after troubleshooting, consider:
- Updating RouterOS to the latest stable version
- Reporting bugs to MikroTik support with detailed reproduction steps
- Using alternative safety mechanisms like scheduled script rollbacks
Understanding these common issues and their solutions ensures Safe Mode remains a reliable component of your remote management strategy.
MikroTik Safe Mode in Action: Real-World Remote Configuration Scenarios
Theory and procedures are valuable, but seeing Safe Mode in action through real-world scenarios helps solidify understanding. Let’s walk through three common situations where Safe Mode proves its worth, examining the exact workflow, potential pitfalls, and professional approaches.
Scenario 1: Firewall Rule Modification on Remote Router
The Situation:
You’re managing a MikroTik router at a remote office 150 miles away. You need to add a new firewall rule to block a specific source IP address that’s been attempting brute-force SSH attacks. The current firewall configuration already has several rules, and you need to insert the new rule in the correct position to ensure it takes effect.
The Risk:
Firewall modifications are among the most dangerous remote changes. A misplaced rule could easily block your management access, or worse, accidentally block all traffic. One wrong move and you’re locked out.
The Safe Mode Approach:
Step 1: Pre-Change Preparation
# Create backup before starting
/system backup save name=before-firewall-change
/export file=before-firewall-change

# Document current firewall rules
/ip firewall filter print
Take a screenshot or copy the output. You now have a record of the exact current state.
Step 2: Enable Safe Mode
In Winbox, press Ctrl+X. Verify the [Safe Mode] indicator appears in the title bar.
Step 3: Make the Change
# Add the blocking rule at the beginning of the input chain
/ip firewall filter add chain=input action=drop \
    src-address=203.0.113.50 place-before=0 \
    comment="Block brute force source"
Step 4: Test Thoroughly
- Verify you can still access the router (you’re still connected, so this is working)
- Open a second connection from a different IP if possible to verify remote access
- Check that legitimate traffic still flows correctly
- Verify the rule appears in the correct position:
/ip firewall filter print - Wait 2-3 minutes to ensure no delayed effects
Step 5: Commit or Rollback
Everything works correctly—press Ctrl+X again to exit Safe Mode and commit the change.
What Could Go Wrong Without Safe Mode:
Imagine you made a typo in the command:
# WRONG - this would block YOUR IP instead of the attacker's
/ip firewall filter add chain=input action=drop \
    src-address=192.168.1.100 place-before=0
If 192.168.1.100 is your IP address, you’d be instantly disconnected. Without Safe Mode, you’d need either:
- Someone on-site to fix it (expensive and time-consuming)
- A scheduled rollback script you set up beforehand
- Out-of-band access through a different network path
With Safe Mode enabled, the instant you get disconnected, the router automatically removes the bad rule, restoring your access.
Scenario 2: IP Address Change on Remote WAN Interface
The Situation:
Your ISP is changing the subnet for your remote office’s WAN connection. You need to update the MikroTik router’s WAN interface from 203.0.113.10/24 (gateway 203.0.113.1) to 198.51.100.50/24 (gateway 198.51.100.1). You’re currently managing the router through a VPN tunnel that depends on the WAN connection.
The Risk:
This is a high-risk change because:
- Changing the WAN IP could break your VPN connection
- An incorrect IP or gateway will disconnect you immediately
- Timing matters—you need to coordinate with the ISP’s change
The Safe Mode Approach:
Step 1: Prepare Alternative Access
Before touching the WAN interface, ensure you have backup access:
# If possible, establish a second management path
# For example, enable management on a LAN interface
/ip address add address=192.168.88.1/24 interface=ether2

# Configure firewall to allow management from LAN
/ip firewall filter add chain=input connection-state=established,related \
    action=accept place-before=0
/ip firewall filter add chain=input in-interface=ether2 \
    protocol=tcp dst-port=22,8291 action=accept place-before=1
If you have someone on-site, have them connect a laptop to ether2 with IP 192.168.88.100. They can provide backup access if needed.
Step 2: Coordinate Timing
Confirm with the ISP exactly when they’re making the change. You want to make your configuration change at the same moment they change their equipment.
Step 3: Create Backup and Enable Safe Mode
/system backup save name=before-ip-change
Press Ctrl+X to enable Safe Mode.
Step 4: Make the Changes
# Remove old IP address
/ip address remove [find address="203.0.113.10/24"]

# Add new IP address
/ip address add address=198.51.100.50/24 interface=ether1

# Update default route
/ip route remove [find gateway="203.0.113.1"]
/ip route add gateway=198.51.100.1
Step 5: Test Connectivity
You’ll likely lose connection when you remove the old IP. Wait 30 seconds to 1 minute:
- If the ISP has made their change correctly, you should regain connectivity with the new IP
- Try connecting to the new IP address:
ssh admin@198.51.100.50 - If connection fails, don’t panic—Safe Mode will rollback in a moment
Step 6: Commit or Rollback
If you successfully reconnect with the new IP, press Ctrl+X to commit. If you don’t reconnect within a minute or two, Safe Mode automatically rolls back to the old configuration.
Common Pitfalls in This Scenario:
- ISP timing mismatch: You change your IP, but the ISP hasn’t changed their gateway yet. Safe Mode saves you by rolling back until timing is coordinated.
- Typo in new IP address: You type 198.51.100.55 instead of .50. The wrong IP doesn’t work, you lose connection, Safe Mode rolls back.
- Forgetting to update routes: You change the IP but forget to update the default route. Traffic can’t route properly, connection fails, rollback occurs.
Without Safe Mode, any of these mistakes requires either on-site assistance or out-of-band access to correct.
Scenario 3: NAT Configuration Update for New Server
The Situation:
A remote office is adding a new web server on their LAN (192.168.1.100). You need to configure destination NAT to forward incoming traffic on WAN port 443 to this internal server. The office already has several NAT rules for other services.
The Risk:
While NAT changes typically don’t affect management access (since you’re usually managing from inside or via VPN), mistakes can still cause issues:
- Incorrect source NAT could break outbound connectivity
- Overly broad NAT rules might affect management traffic
- Rule order matters—a misplaced rule might not trigger correctly
The Safe Mode Approach:
Step 1: Understand Current NAT Configuration
/ip firewall nat print
Review existing rules to understand the current configuration and determine where the new rule should be placed.
Step 2: Enable Safe Mode and Create Backup
/system backup save name=before-nat-change
Press Ctrl+X to enable Safe Mode.
Step 3: Add the NAT Rule
/ip firewall nat add chain=dstnat protocol=tcp \
    dst-port=443 in-interface=ether1 \
    action=dst-nat to-addresses=192.168.1.100 to-ports=443 \
    comment="Forward HTTPS to web server"
Step 4: Add Corresponding Firewall Rule
/ip firewall filter add chain=forward protocol=tcp \
    dst-address=192.168.1.100 dst-port=443 \
    connection-state=new action=accept \
    comment="Allow HTTPS to web server"
Step 5: Test the Configuration
- Verify you still have management access (you should)
- From an external location, test connecting to the public IP on port 443
- Verify the connection reaches the internal server correctly
- Check that existing NAT rules still function properly
- Monitor for 5 minutes to ensure stability
Step 6: Exit Safe Mode
Once testing confirms everything works, press Ctrl+X to commit the changes.
Why Use Safe Mode for NAT Changes:
You might wonder why to use Safe Mode for a change that likely won’t disconnect you. Here’s why it’s still valuable:
- If you accidentally create an overly broad source NAT rule, it might affect management traffic
- Complex NAT configurations can have unexpected interactions
- If you’re making multiple changes (NAT + firewall + routing), Safe Mode protects the entire workflow
- Professional practice: use Safe Mode for any remote change that could potentially affect connectivity
What Could Go Wrong:
Imagine you made this mistake:
# WRONG - accidentally created source NAT that affects everything
/ip firewall nat add chain=srcnat out-interface=ether1 \
    action=masquerade
Depending on your exact configuration, this overly broad rule might NAT your management traffic, potentially causing issues. With Safe Mode, if this breaks your connection, the rule automatically disappears.
Key Lessons from These Scenarios
Across all three scenarios, several patterns emerge:
- Always prepare before enabling Safe Mode: Create backups, document current state
- Enable Safe Mode before making the change, not after
- Test thoroughly before committing: Don’t rush the testing phase
- Have backup access when possible: Secondary connection paths provide additional safety
- Use Safe Mode even for “low risk” changes: Professional practice reduces overall risk
- Document each change: Keep notes of what you did and when
These real-world scenarios demonstrate that Safe Mode isn’t just a theoretical safety feature—it’s a practical tool that regularly saves administrators from costly mistakes and downtime.
Master MikroTik Safe Mode for Confident Remote Network Management
Managing MikroTik routers remotely doesn’t have to be a nerve-wracking experience filled with anxiety about making mistakes. MikroTik Safe Mode transforms remote configuration from a risky endeavor into a controlled, professional process where you can work confidently knowing there’s a safety net beneath you.
Throughout this comprehensive guide, we’ve explored every aspect of Safe Mode:
- What Safe Mode is: An automatic rollback mechanism that monitors your connection and reverts changes if connectivity is lost
- Why it’s essential: Protection against configuration mistakes that could lock you out of remote devices, preventing costly downtime and emergency site visits
- How to use it: Simple activation with Ctrl+X across Winbox, Terminal, and WebFig interfaces
- Best practices: Professional workflows including pre-change backups, methodical testing, and proper documentation
- Limitations: Understanding what Safe Mode can’t protect against helps you implement complementary safety measures
- Advanced techniques: Combining Safe Mode with other RouterOS features for comprehensive protection
- Troubleshooting: Resolving common issues to keep Safe Mode working reliably
- Real-world applications: Practical scenarios showing Safe Mode in action
Key Takeaways for Professional Network Management
1. Make Safe Mode a Habit, Not an Afterthought
The most important lesson is this: Always use Safe Mode for remote configuration changes that could affect connectivity. Don’t evaluate each change individually to decide if Safe Mode is necessary. Make it a standard practice—press Ctrl+X before making any remote change. The few seconds it takes could save hours of troubleshooting and hundreds or thousands of dollars in emergency responses.
2. Safe Mode Is Part of a Comprehensive Strategy
Safe Mode is powerful, but it’s not a complete solution by itself. Professional network management requires multiple layers of protection:
- Regular automated backups
- Out-of-band management access
- Change management procedures and documentation
- Monitoring and alerting systems
- Testing in lab environments before production changes
3. Understanding Limitations Prevents Overconfidence
Safe Mode protects against connection-breaking configuration mistakes, but it doesn’t protect against everything. Knowing its limitations helps you recognize when additional safety measures are necessary and prevents complacency that could lead to other types of errors.
4. Practice Makes Perfect
If you’re new to Safe Mode or MikroTik management, practice in a lab environment first. Set up a test router, enable Safe Mode, intentionally make connection-breaking changes, and watch the rollback mechanism work. This hands-on experience builds confidence and familiarity that translates to better performance when managing production devices.
Moving Forward: Implementing Safe Mode in Your Workflow
Here’s how to make Safe Mode a standard part of your network management practice:
Immediate Actions:
- Test Safe Mode on a lab router or during your next low-risk change
- Create a change management checklist that includes “Enable Safe Mode” as a mandatory step
- Document your organization’s Safe Mode procedures and share with your team
- Review your backup and recovery procedures to complement Safe Mode
Long-Term Improvements:
- Implement out-of-band management for critical remote sites
- Develop monitoring and alerting for all managed devices
- Create a change management process that requires Safe Mode usage
- Train all team members on Safe Mode best practices
- Establish a lab environment for testing complex changes before production deployment
Final Thoughts
Remote network management is inherently challenging. Distance adds complexity and risk to every configuration change. But with MikroTik Safe Mode, you have a powerful tool that dramatically reduces those risks.
Safe Mode won’t eliminate all possibility of mistakes—no tool can do that. But it does eliminate one of the most costly categories of errors: changes that lock you out of remote devices. This alone makes it invaluable for anyone responsible for MikroTik router management.
The difference between administrators who confidently manage dozens or hundreds of remote MikroTik devices and those who approach each change with trepidation often comes down to systematic use of safety features like Safe Mode. It’s not about technical brilliance or years of experience—it’s about professional habits and procedures.
Start using MikroTik Safe Mode today. Make it a reflexive habit to press Ctrl+X before making any remote change. Your future self—and your organization—will thank you when Safe Mode automatically saves you from what could have been a very expensive mistake.
Network management is challenging enough without adding unnecessary risk. Safe Mode gives you the confidence to manage your MikroTik infrastructure professionally, efficiently, and safely, no matter how many miles separate you from the devices you’re managing.
Master Safe Mode. Manage confidently. Sleep better at night.
Frequently Asked Questions About MikroTik Safe Mode
Does Safe Mode work over wireless connections?
Yes, Safe Mode works over wireless connections, but with important caveats. Wireless connections are inherently less stable than wired connections, and brief signal fluctuations can disconnect your session, triggering Safe Mode’s automatic rollback even when you didn’t make a mistake. For this reason, it’s best practice to manage MikroTik devices over wired connections whenever possible. If you must use wireless, ensure you have a strong, stable signal before making changes. Never modify wireless settings while connected via wireless—this is almost guaranteed to disconnect you and trigger a rollback. Instead, establish a wired management connection first, or use scheduled script rollbacks as an alternative safety mechanism.
What happens if my session times out in Safe Mode?
If your session times out while Safe Mode is active, RouterOS treats this as a connection loss and automatically rolls back any uncommitted changes you made during that Safe Mode session. This is actually a safety feature—it prevents abandoned sessions from leaving configurations in an uncommitted state indefinitely. To avoid unintended rollbacks due to timeouts, keep your session active by periodically sending commands or clicking in the interface. You can also configure keep-alive settings in your SSH client to maintain the connection. If you need to step away from your computer, it’s best to either exit Safe Mode (committing your changes if they’re working correctly) or intentionally allow the rollback to occur and re-enable Safe Mode when you return.
Can I use Safe Mode with scripts?
Safe Mode cannot be used directly within automated scripts because it’s a session-based feature that requires an interactive connection to monitor. Scripts execute to completion without maintaining the type of session that Safe Mode monitors. However, you can achieve similar protection using scheduled script rollbacks. Create a system backup before your script runs, then schedule a task to restore that backup after a certain time (e.g., 10 minutes). Your script makes its changes, and if everything works correctly, the script removes the scheduled rollback task. If the script fails or causes problems, the scheduled rollback automatically restores the working configuration. This provides protection similar to Safe Mode for automated operations.
Does Safe Mode protect against all configuration mistakes?
No, Safe Mode only protects against configuration changes that cause you to lose connectivity to the device. If you make a configuration error that doesn’t disconnect your management session, Safe Mode won’t automatically roll it back. For example, misconfiguring a DHCP server, breaking NAT rules for users, or changing QoS settings incorrectly won’t trigger Safe Mode if these changes don’t affect your own connection to the router. Safe Mode is specifically designed to protect against the scenario of locking yourself out of a remote device. For comprehensive protection against all configuration errors, you need additional safety measures including regular backups, thorough testing, change management procedures, and monitoring systems that alert you to problems even when you maintain connectivity.
How long does Safe Mode keep changes before rolling back?
Safe Mode doesn’t have a predetermined time limit for rollback. Instead, it monitors your active connection continuously. As long as your session remains connected, Safe Mode will keep your changes uncommitted indefinitely. The rollback only triggers when your connection is actually lost—either because a configuration change broke connectivity, your network path failed, or your session timed out due to inactivity. This means you can take as much time as you need to test changes thoroughly before committing them. There’s no countdown timer forcing you to make a decision. However, very long Safe Mode sessions (hours) are generally not recommended because they increase the risk of accidental disconnection due to network instability, session timeouts, or other factors unrelated to your configuration changes.
Can multiple administrators use Safe Mode simultaneously?
Yes, multiple administrators can connect to the same MikroTik device with each using Safe Mode in their own session. However, it’s important to understand that each session’s Safe Mode status is independent. If Administrator A is in Safe Mode and Administrator B is also in Safe Mode, they each have separate rollback protection for their own changes. If Administrator A gets disconnected, only Administrator A’s uncommitted changes roll back—Administrator B’s session is unaffected. However, this can create confusion and conflicts. If both administrators are making changes to the same configuration areas, the interactions can be unpredictable. Best practice: Implement change control procedures to ensure only one administrator modifies the configuration at any given time. Use /user active print to see who else is connected before making changes.
Is Safe Mode available in all RouterOS versions?
Safe Mode has been a standard feature in RouterOS for many years and is available in all currently supported RouterOS versions, including both version 6.x and version 7.x. The feature works consistently across versions, though there may be minor differences in implementation details. Very old RouterOS versions (end-of-life versions from many years ago) might have limited Safe Mode functionality, but any modern RouterOS installation will fully support Safe Mode. The feature works identically whether you’re running RouterOS on hardware routers, the Cloud Hosted Router (CHR), or any other MikroTik platform. If you’re using a very old RouterOS version and Safe Mode doesn’t seem to work correctly, updating to a current stable release should resolve any issues. Always verify your RouterOS version is still supported and consider upgrading if you’re running outdated software.
Check our list of MikroTik guides