Site-to-Site VPN Using MikroTik: A Step-by-Step Guide
In today’s interconnected business environment, establishing secure and reliable connections between geographically separated offices is essential. Site-to-site VPNs provide the backbone for this connectivity, enabling the seamless extension of your network across multiple locations while maintaining security and performance.
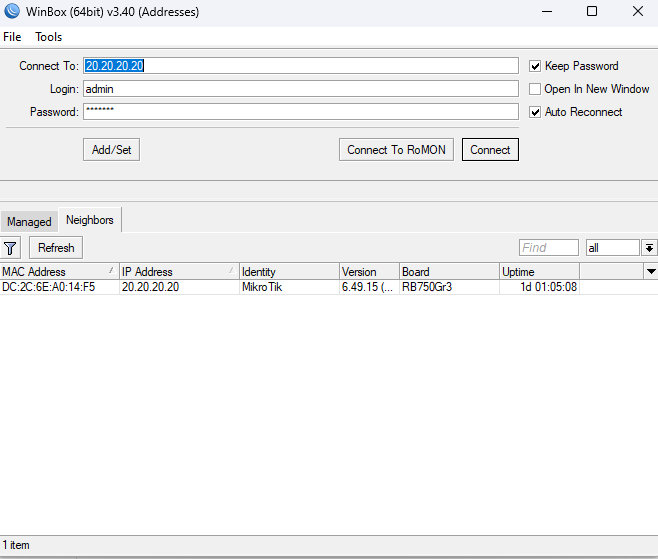
MikroTik RouterOS, with its robust feature set and cost-effective hardware options, has emerged as an excellent solution for implementing enterprise-grade VPNs without the premium price tag of other commercial solutions. Whether you’re managing a small business with two locations or an enterprise with dozens of sites, MikroTik provides the tools necessary to build a secure, scalable VPN infrastructure.
This comprehensive guide is designed specifically for network engineers and system administrators who need to implement, optimize, and maintain site-to-site VPNs using MikroTik equipment. We’ll cover everything from basic concepts to advanced configurations, with real-world examples and troubleshooting tips derived from years of field experience.
By the end of this guide, you’ll be able to:
- Design and plan an appropriate VPN topology for your network requirements
- Choose the right VPN protocol for your specific use case
- Implement secure IPsec and L2TP/IPsec VPN tunnels between MikroTik routers
- Troubleshoot common VPN connectivity issues
- Apply security best practices to harden your VPN implementation
- Optimize performance for maximum throughput and reliability
- Integrate your VPN with existing infrastructure and authentication systems
Table of Contents
- Understanding Site-to-Site VPN Fundamentals
- Prerequisites and Planning
- MikroTik VPN Protocol Options
- Detailed Step-by-Step Implementation Guide: IPsec VPN
- Alternative Implementation: L2TP/IPsec
- Testing and Troubleshooting
- Advanced Configuration Options
- Security Hardening Best Practices
- Real-World Deployment Examples
- Performance Optimization
- Integration with Existing Infrastructure
- Conclusion
Understanding Site-to-Site VPN Fundamentals
What is a Site-to-Site VPN?
A site-to-site VPN creates a secure tunnel between two or more networks, typically connecting branch offices to headquarters or connecting multiple offices to each other. Unlike remote-access VPNs where individual users connect to a network, site-to-site VPNs connect entire networks together, making them appear as one unified network to users.
Key Characteristics of Site-to-Site VPNs:
- Always-on connectivity – The VPN tunnel remains established continuously
- Transparent to end-users – Users access remote resources as if they were local
- Network-level implementation – No client software needed on user devices
- Fixed endpoints – Typically established between routers or firewalls
- Network address translation considerations – Typically involves routing between private IP subnets
Primary Business Benefits:
- Cost savings – Eliminate expensive leased lines or MPLS connections
- Secure data transfer – Encrypt sensitive information across the public internet
- Resource sharing – Enable access to centralized applications, servers, and services
- Business continuity – Support disaster recovery and redundancy plans
- Scalability – Easily add new sites as your business grows
Comparison with Other VPN Types:
| Feature | Site-to-Site VPN | Remote Access VPN | Client-to-Site VPN |
|---|---|---|---|
| Primary Use | Connect entire networks | Connect individual users | Connect individual users |
| Client Software | Not required | Required | Required |
| Connection Type | Permanent | On-demand | On-demand |
| Endpoint Type | Network devices | End-user devices | End-user devices |
| User Interaction | Transparent | User-initiated | User-initiated |
Prerequisites and Planning
Required Hardware and Software:
- MikroTik routers – At least one router per site (recommended models: RB4011, CCR series for high performance, or hEX series for small offices)
- RouterOS version – Version 6.47 or newer (RouterOS 7.x recommended for newer features and improved performance)
- Public IP addresses – Static IPs preferred, but dynamic DNS can work with proper configuration
- Internet connectivity – Sufficient bandwidth for your expected traffic volume
- Optional: Backup connectivity – Secondary WAN links for redundancy
Network Topology Considerations:
Before implementing your VPN, careful planning of your network topology is crucial. Here’s a checklist to ensure proper design:
- Identify all sites that need to be connected
- Determine the network topology (hub-and-spoke, full mesh, or partial mesh)
- Document WAN interface details for each site (IP addresses, connection types)
- Map out local network subnets at each location
- Identify critical resources that will be accessed over the VPN
- Estimate bandwidth requirements between locations
- Plan for future growth and potential additional sites
IP Addressing Scheme Recommendations:
A well-planned IP addressing scheme is critical for a successful VPN implementation:
- Use non-overlapping private IP ranges for each site (e.g., Site A: 192.168.1.0/24, Site B: 192.168.2.0/24)
- Allocate subnets according to size requirements of each location
- Reserve address space for future expansion
- Consider using a different private IP range (like 10.x.x.x) if you need more addresses
- Document your IP scheme thoroughly including VLAN assignments if applicable
Security Requirements Checklist:
- Strong encryption – AES-256 recommended for data protection
- Strong authentication – Pre-shared keys (PSK) at minimum, certificates preferred
- Perfect Forward Secrecy (PFS) – Ensure compromise of one key doesn’t compromise future sessions
- Firewall rules – Allow only necessary traffic over the VPN
- Regular security updates – Keep RouterOS updated to patch vulnerabilities
- Access control – Restrict VPN configuration access to authorized administrators
- Monitoring and logging – Enable logging for VPN connections and failures
MikroTik VPN Protocol Options
MikroTik RouterOS supports several VPN protocols, each with its own strengths and ideal use cases. Understanding these options will help you select the best protocol for your specific requirements.
IPsec
- Pros:
- Industry standard with strong security
- Widely compatible with other vendors
- Hardware acceleration on many MikroTik models
- Operates at Layer 3 (Network layer)
- Supports both tunnel and transport modes
- Cons:
- More complex to configure than some alternatives
- Can be challenging to troubleshoot
- May require additional configuration for traversing NAT
- Best for: Enterprise deployments, multi-vendor environments, and situations requiring high security standards
L2TP/IPsec
- Pros:
- Combines L2TP tunneling with IPsec encryption
- Works well through NAT
- Operates at Layer 2 (Data link layer)
- Can transport non-IP protocols
- Cons:
- Double encapsulation introduces more overhead
- Slightly lower performance compared to pure IPsec
- Requires more complex configuration
- Best for: Situations where Layer 2 connectivity is required, or when you need to bridge remote networks
PPTP (Point-to-Point Tunneling Protocol)
- Pros:
- Simple to configure
- Widely supported
- Lower overhead than other options
- Cons:
- Known security vulnerabilities (considered insecure by modern standards)
- Limited encryption strength
- May be blocked by some firewalls
- Best for: Legacy systems or non-sensitive data where ease of setup is prioritized over security
OpenVPN
- Pros:
- Open-source with strong security
- Excellent at traversing restrictive firewalls and NAT
- Flexible authentication options
- Cons:
- Limited hardware acceleration on MikroTik devices
- Higher CPU usage compared to IPsec
- Not ideal for high-throughput requirements on MikroTik
- Best for: Situations where firewall traversal is challenging, or when connecting to non-MikroTik endpoints
SSTP (Secure Socket Tunneling Protocol)
- Pros:
- Uses SSL, making it excellent for firewall traversal
- Works well with Microsoft clients
- Relatively secure
- Cons:
- Higher overhead
- Limited hardware acceleration
- More Microsoft-oriented than vendor-neutral
- Best for: Environments with Windows clients or where standard VPN ports are blocked
Wireguard (RouterOS 7+)
- Pros:
- Modern, lightweight, high-performance protocol
- Simple configuration compared to IPsec
- Excellent security with modern cryptography
- Lower overhead and better performance
- Cons:
- Requires RouterOS 7 or newer
- Less mature than IPsec in enterprise environments
- Fewer configuration options for complex deployments
- Best for: Modern deployments where performance is key, especially with RouterOS 7 devices
Detailed Step-by-Step Implementation Guide: IPsec VPN
In this section, we’ll implement a site-to-site IPsec VPN between two MikroTik routers. Our example will connect two office networks: Office A (192.168.1.0/24) and Office B (192.168.2.0/24).
Office A                                  Office B
+-------------+                           +-------------+
|192.168.1.0/24|                          |192.168.2.0/24|
|             |                           |             |
|   LAN       |                           |   LAN       |
+-----+-------+                           +------+------+
      |                                          |
      |                                          |
+-----+-------+      INTERNET         +----------+-----+
| RouterA     +------------------------+ RouterB       |
| WAN: 203.0.113.1 |                   | WAN: 203.0.113.2 |
+-------------+                        +----------------+
Step 1: Configure IP Addresses
Let’s start by configuring the IP addresses on both routers. This assumes your routers already have basic internet connectivity.
Router A:
/ip address
add address=192.168.1.1/24 interface=ether1 comment="LAN"
add address=203.0.113.1/24 interface=ether2 comment="WAN"
Router B:
/ip address
add address=192.168.2.1/24 interface=ether1 comment="LAN"
add address=203.0.113.2/24 interface=ether2 comment="WAN"
Step 2: Configure Phase 1 (IKE) Settings
The Internet Key Exchange (IKE) protocol establishes the initial secure channel for negotiating the IPsec security associations.
Router A:
/ip ipsec profile
add name=ike-profile hash-algorithm=sha256 enc-algorithm=aes-256 dh-group=modp2048

/ip ipsec proposal
add name=ipsec-proposal auth-algorithms=sha256 enc-algorithms=aes-256-cbc pfs-group=modp2048

/ip ipsec peer
add name=to-office-b address=203.0.113.2 profile=ike-profile exchange-mode=main
Router B:
/ip ipsec profile
add name=ike-profile hash-algorithm=sha256 enc-algorithm=aes-256 dh-group=modp2048

/ip ipsec proposal
add name=ipsec-proposal auth-algorithms=sha256 enc-algorithms=aes-256-cbc pfs-group=modp2048

/ip ipsec peer
add name=to-office-a address=203.0.113.1 profile=ike-profile exchange-mode=main
Step 3: Configure IPsec Pre-shared Key
Set up a strong pre-shared key for authentication.
Router A:
/ip ipsec identity
add peer=to-office-b secret="UseAStrongPasswordHere123!"
Router B:
/ip ipsec identity
add peer=to-office-a secret="UseAStrongPasswordHere123!"
Step 4: Configure Phase 2 (IPsec) Settings
Define the actual traffic that will be encrypted and the network subnets on both ends.
Router A:
/ip ipsec policy
add src-address=192.168.1.0/24 dst-address=192.168.2.0/24 sa-src-address=203.0.113.1 \
    sa-dst-address=203.0.113.2 proposal=ipsec-proposal tunnel=yes
Router B:
/ip ipsec policy
add src-address=192.168.2.0/24 dst-address=192.168.1.0/24 sa-src-address=203.0.113.2 \
    sa-dst-address=203.0.113.1 proposal=ipsec-proposal tunnel=yes
Step 5: Configure Firewall Rules
Allow IPsec traffic through the firewall. These rules assume you already have basic firewall protection in place.
Both Routers:
# Allow IPsec protocols (ESP, IKE)
/ip firewall filter
add chain=input protocol=ipsec-esp action=accept place-before=1 comment="Allow IPsec ESP"
add chain=input protocol=udp dst-port=500 action=accept place-before=2 comment="Allow IKE"
add chain=input protocol=udp dst-port=4500 action=accept place-before=3 comment="Allow NAT-T"

# Forward traffic between VPN networks
/ip firewall filter
add chain=forward src-address=192.168.1.0/24 dst-address=192.168.2.0/24 action=accept \
    comment="Allow Office A to Office B"
add chain=forward src-address=192.168.2.0/24 dst-address=192.168.1.0/24 action=accept \
    comment="Allow Office B to Office A"
Step 6: Test Your VPN Connection
Verify that the IPsec tunnel is established and working:
# Check if the IPsec policy is working (look for "established")
/ip ipsec policy print

# View active peers
/ip ipsec peer print

# View detailed IPsec stats
/ip ipsec installed-sa print
You can also test connectivity by pinging across the tunnel:
# From Router A
ping 192.168.2.1 src-address=192.168.1.1

# From Router B
ping 192.168.1.1 src-address=192.168.2.1
Using Certificate-Based Authentication (Advanced)
For increased security, you can replace PSK authentication with certificates:
Step 1: Create a Certificate Authority on one router
/certificate
add name=CA-Template common-name=MyVPN-CA key-usage=key-cert-sign,crl-sign
/certificate sign CA-Template ca-crl-host=203.0.113.1 name=MyVPN-CA
Step 2: Create and sign certificates for each router
# On Router A
/certificate
add name=RouterA-Template common-name=RouterA
/certificate sign RouterA-Template ca=MyVPN-CA name=RouterA

# Export CA certificate to transfer to Router B
/certificate export-certificate MyVPN-CA

# On Router B (after importing CA cert)
/certificate import file-name=myvpn-ca.crt
/certificate
add name=RouterB-Template common-name=RouterB
/certificate sign RouterB-Template ca=MyVPN-CA name=RouterB
Step 3: Update IPsec peer configuration to use certificates
# On Router A
/ip ipsec identity
remove numbers=0
add peer=to-office-b auth-method=rsa-signature certificate=RouterA match-by=certificate remote-certificate=RouterB

# On Router B
/ip ipsec identity
remove numbers=0
add peer=to-office-a auth-method=rsa-signature certificate=RouterB match-by=certificate remote-certificate=RouterA
Alternative Implementation: L2TP/IPsec
L2TP/IPsec provides an alternative approach that combines the tunneling capabilities of L2TP with the security of IPsec. This approach can be beneficial in certain scenarios, particularly when you need Layer 2 connectivity between sites.
Step 1: Configure L2TP Server on Router A
/interface l2tp-server server
set enabled=yes use-ipsec=yes ipsec-secret="StrongIPSecSecret123" default-profile=default

/ppp profile
set default local-address=10.0.0.1 remote-address=l2tp-pool

/ip pool
add name=l2tp-pool ranges=10.0.0.2-10.0.0.254

/ppp secret
add name=office-b password="StrongL2TPPassword123" service=l2tp profile=default
Step 2: Configure L2TP Client on Router B
/interface l2tp-client
add name=l2tp-to-office-a connect-to=203.0.113.1 user=office-b password="StrongL2TPPassword123" \
    use-ipsec=yes ipsec-secret="StrongIPSecSecret123" disabled=no

# Wait for connection, then configure routing
/ip route
add dst-address=192.168.1.0/24 gateway=l2tp-to-office-a
Step 3: Configure Bridge Between Networks (Optional)
If you want true Layer 2 connectivity where both networks appear as one broadcast domain:
# On Router A
/interface bridge
add name=office-bridge
/interface bridge port
add bridge=office-bridge interface=ether1
add bridge=office-bridge interface=l2tp-in1 # Name may vary - check after connection

# On Router B
/interface bridge
add name=office-bridge
/interface bridge port
add bridge=office-bridge interface=ether1
add bridge=office-bridge interface=l2tp-to-office-a
Step 4: Configure Firewall Rules
# On both routers
/ip firewall filter
add chain=input protocol=udp dst-port=1701 action=accept comment="Allow L2TP"
add chain=input protocol=ipsec-esp action=accept comment="Allow IPsec ESP"
add chain=input protocol=udp dst-port=500 action=accept comment="Allow IKE"
add chain=input protocol=udp dst-port=4500 action=accept comment="Allow NAT-T"
Advantages of L2TP/IPsec in Specific Scenarios:
- Broadcast traffic support – Allows broadcast-based protocols to work across the VPN
- Simplifies certain networking scenarios – Can make network extension more straightforward
- Client compatibility – Works well with various client operating systems if needed
- Better NAT traversal – Sometimes performs better through NAT than pure IPsec
Testing and Troubleshooting
Even with careful configuration, VPN issues can arise. This section provides a systematic approach to verifying, testing, and troubleshooting your MikroTik site-to-site VPN.
Verification Commands
Use these commands to verify your VPN status and connectivity:
For IPsec VPNs:
# View IPsec policies and their status
/ip ipsec policy print

# View active IPsec peers
/ip ipsec peer print

# View established security associations
/ip ipsec installed-sa print

# Check IPsec statistics
/ip ipsec statistics print
For L2TP/IPsec VPNs:
# Check L2TP server status
/interface l2tp-server server print

# View active L2TP connections
/interface l2tp-server print

# Check L2TP client status
/interface l2tp-client print
Common Issues and Solutions
Here are solutions to the most frequent VPN problems encountered with MikroTik routers:
| Issue | Possible Causes | Solutions |
|---|---|---|
| VPN tunnel not establishing |
|
|
| Tunnel establishes but no traffic flows |
|
|
| Intermittent connection drops |
|
|
| Poor performance |
|
|
Logging and Monitoring Best Practices
Effective logging helps identify issues faster:
# Enable IPsec logging
/system logging add topics=ipsec action=memory
/system logging add topics=ipsec,!debug action=disk

# View IPsec logs
/log print where topics~"ipsec"
For continuous monitoring, configure SNMP or export logs to a central logging server:
# Configure remote logging
/system logging action
add name=remote target=remote remote=10.10.10.5 remote-port=514

/system logging
add topics=ipsec action=remote
Packet Capture for VPN Troubleshooting
Packet captures are invaluable for diagnosing complex VPN issues:
# Capture IPsec negotiation traffic
/tool sniffer
set filter-ip-protocol=esp filter-port=500,4500 filter-interface=ether2
start

# Capture encapsulated traffic
/tool sniffer
set filter-ip-protocol=esp filter-interface=ether2
start
/tool sniffer packet print file=capture follow=yesAdvanced Configuration Options
Failover and Redundancy Setup
Create redundant VPN connections to ensure business continuity:
# Configure dual WAN interfaces
/ip address
add address=203.0.113.1/24 interface=ether2 comment="Primary WAN"
add address=198.51.100.1/24 interface=ether3 comment="Secondary WAN"

# Create additional IPsec peer for backup connection
/ip ipsec peer
add name=to-office-b-primary address=203.0.113.2 profile=ike-profile
add name=to-office-b-backup address=198.51.100.2 profile=ike-profile

# Configure policies for both paths
/ip ipsec policy
add src-address=192.168.1.0/24 dst-address=192.168.2.0/24 sa-src-address=203.0.113.1 \
    sa-dst-address=203.0.113.2 proposal=ipsec-proposal tunnel=yes priority=10
add src-address=192.168.1.0/24 dst-address=192.168.2.0/24 sa-src-address=198.51.100.1 \
    sa-dst-address=198.51.100.2 proposal=ipsec-proposal tunnel=yes priority=20
Use Netwatch to detect failures and perform automatic failover:
/tool netwatch
add host=203.0.113.2 interval=10s timeout=5s up-script="\
    /ip ipsec policy set numbers=0 disabled=no; \
    /ip ipsec policy set numbers=1 disabled=yes; \
    /log info message=\"Switched to primary VPN\""
down-script="\
    /ip ipsec policy set numbers=0 disabled=yes; \
    /ip ipsec policy set numbers=1 disabled=no; \
    /log info message=\"Switched to backup VPN\""
Split Tunneling Configuration
Split tunneling allows you to route only specific traffic through the VPN:
# Only tunnel traffic to specific services, not all LAN traffic
/ip ipsec policy
add src-address=192.168.1.0/24 dst-address=192.168.2.100/32 sa-src-address=203.0.113.1 \
    sa-dst-address=203.0.113.2 proposal=ipsec-proposal tunnel=yes comment="File Server"
add src-address=192.168.1.0/24 dst-address=192.168.2.200/32 sa-src-address=203.0.113.1 \
    sa-dst-address=203.0.113.2 proposal=ipsec-proposal tunnel=yes comment="Database Server"
Quality of Service (QoS) Implementation
Prioritize important traffic over your VPN:
# Mark VPN traffic by type
/ip firewall mangle
add chain=forward action=mark-packet new-packet-mark=vpn-voip passthrough=yes \
    protocol=udp dst-port=5060,10000-20000 ipsec-policy=ipsec
add chain=forward action=mark-packet new-packet-mark=vpn-data passthrough=yes \
    ipsec-policy=ipsec

# Set up queue trees
/queue tree
add name=VPN-QoS parent=global-out
add name=VPN-VoIP parent=VPN-QoS packet-mark=vpn-voip priority=1 limit-at=1M max-limit=5M
add name=VPN-Data parent=VPN-QoS packet-mark=vpn-data priority=5 limit-at=5M max-limit=20M
Load Balancing Across Multiple VPN Tunnels
Distribute traffic across multiple tunnels for better throughput:
# Create multiple tunnels
/ip ipsec policy
add src-address=192.168.1.0/24 dst-address=192.168.2.0/24 sa-src-address=203.0.113.1 \
    sa-dst-address=203.0.113.2 proposal=ipsec-proposal tunnel=yes
add src-address=192.168.1.0/24 dst-address=192.168.2.0/24 sa-src-address=198.51.100.1 \
    sa-dst-address=198.51.100.2 proposal=ipsec-proposal tunnel=yes

# Configure PCC (Per Connection Classifier) to distribute traffic
/ip firewall mangle
add chain=prerouting src-address=192.168.1.0/24 dst-address=192.168.2.0/24 \
    action=mark-routing new-routing-mark=tunnel1 passthrough=yes per-connection-classifier=both-addresses:2/0
add chain=prerouting src-address=192.168.1.0/24 dst-address=192.168.2.0/24 \
    action=mark-routing new-routing-mark=tunnel2 passthrough=yes per-connection-classifier=both-addresses:2/1

# Set up routing rules
/ip route
add dst-address=192.168.2.0/24 gateway=203.0.113.2 routing-mark=tunnel1
add dst-address=192.168.2.0/24 gateway=198.51.100.2 routing-mark=tunnel2
Security Hardening Best Practices
Encryption Recommendations
Use these recommended encryption settings for maximum security:
- Authentication: SHA256 or SHA512
- Encryption: AES-256-CBC or AES-256-GCM (if supported)
- Diffie-Hellman Group: Group 14 (modp2048) or higher
- Perfect Forward Secrecy (PFS): Always enable
- Key Lifetime: Maximum 8 hours for Phase 1, 1 hour for Phase 2
Implementation example:
/ip ipsec profile
add name=secure-ike-profile hash-algorithm=sha256 enc-algorithm=aes-256 dh-group=modp2048

/ip ipsec proposal
add name=secure-ipsec-proposal auth-algorithms=sha256 enc-algorithms=aes-256-cbc pfs-group=modp2048
Certificate Management
Certificate-based authentication provides significantly improved security over pre-shared keys:
- Use proper certificate organization: Create a dedicated CA for VPN certificates
- Implement certificate revocation: Set up a CRL for compromised certificates
- Use appropriate key sizes: Minimum 2048 bits for RSA keys
- Set reasonable certificate lifetimes: 1-2 years, with planned rotation
Regular Security Audit Procedures
Implement these security checks on a regular schedule:
- Quarterly:
- Review VPN user access and remove unneeded accounts
- Update RouterOS to the latest stable version
- Check for weak encryption settings
- Monthly:
- Review firewall logs for unusual activity
- Verify certificate validity dates
- Check VPN tunnel stability and performance
- Weekly:
- Monitor login attempts and failed authentications
- Verify backup configurations are current
Firewall Optimization for VPN Traffic
Secure your VPN traffic with these firewall best practices:
# Allow only necessary VPN traffic
/ip firewall filter
add chain=input protocol=ipsec-esp action=accept src-address=203.0.113.2 comment="Allow ESP from known peer"
add chain=input protocol=udp dst-port=500 action=accept src-address=203.0.113.2 comment="Allow IKE from known peer"
add chain=input protocol=udp dst-port=4500 action=accept src-address=203.0.113.2 comment="Allow NAT-T from known peer"

# Drop unmatched VPN traffic
add chain=input protocol=ipsec-esp action=drop comment="Drop other ESP"
add chain=input protocol=udp dst-port=500 action=drop comment="Drop other IKE"
add chain=input protocol=udp dst-port=4500 action=drop comment="Drop other NAT-T"

# Restrict forwarding to only allowed networks
add chain=forward src-address=192.168.1.0/24 dst-address=192.168.2.0/24 action=accept comment="Allow local to remote"
add chain=forward src-address=192.168.2.0/24 dst-address=192.168.1.0/24 action=accept comment="Allow remote to local"
add chain=forward src-address=192.168.2.0/24 dst-address=0.0.0.0/0 action=drop comment="Prevent remote site from accessing internet through us"
Real-World Deployment Examples
Small Business Implementation Case Study
Consider a small business with headquarters and a single branch office:
Headquarters (HQ)              Branch Office
+--------------+               +--------------+
| 10.1.1.0/24  |               | 10.2.2.0/24  |
|              |   IPsec VPN   |              |
| RB4011       +---------------+ hEX          |
| 80 users     |     100mbps   | 20 users     |
+--------------+    Internet   +--------------+
File server: 10.1.1.10         Shared printer: 10.2.2.15
ERP system: 10.1.1.20          POS system: 10.2.2.25
Key Requirements:
- Secure access to HQ file server and ERP system from the branch
- Branch office POS data replication to HQ
- Internet traffic remains direct from each site
- Budget-conscious implementation
Solution:
IPsec VPN with split tunneling to route only inter-office traffic through the VPN:
# Headquarters Configuration
/ip ipsec profile
add name=small-biz-profile enc-algorithm=aes-256 hash-algorithm=sha256 dh-group=modp2048

/ip ipsec proposal
add name=small-biz-proposal enc-algorithms=aes-256-cbc auth-algorithms=sha256 pfs-group=modp2048

/ip ipsec peer
add name=branch-office address=203.0.113.2 profile=small-biz-profile

/ip ipsec identity
add peer=branch-office secret="StrongPassword123!"

/ip ipsec policy
add src-address=10.1.1.0/24 dst-address=10.2.2.0/24 sa-src-address=203.0.113.1 \
    sa-dst-address=203.0.113.2 proposal=small-biz-proposal tunnel=yes
For the branch office, a similar configuration with reversed network addresses would be implemented.
Enterprise Multi-Site VPN Deployment
For a larger enterprise with multiple sites, a hub-and-spoke topology provides centralized management:
                         +--------------+
                         | Headquarters |
                         | 172.16.0.0/16|
                         | CCR1036      |
                         +-+----+----+--+
                           |    |    |
                           |    |    |
         +----------------+     |     +----------------+
         |                      |                      |
+--------+------+    +----------+--------+    +-------+-------+
| Branch Office A|    | Branch Office B  |    | Branch Office C|
| 172.17.0.0/16  |    | 172.18.0.0/16    |    | 172.19.0.0/16  |
| RB4011         |    | RB4011           |    | CCR1009        |
+----------------+    +-------------------+    +----------------+
Key Requirements:
- Centralized management of all VPN connections
- Traffic between branches routed through headquarters
- High reliability with redundant connections
- Quality of Service for voice and video traffic
- Integration with Active Directory for user authentication
Solution Highlights:
# HQ Configuration with IPsec Policy Template
/ip ipsec policy group
add name=branch-offices

# Create template policy for each branch
/ip ipsec policy
add template=yes group=branch-offices src-address=172.16.0.0/16 dst-address=172.17.0.0/16 proposal=enterprise-proposal
add template=yes group=branch-offices src-address=172.16.0.0/16 dst-address=172.18.0.0/16 proposal=enterprise-proposal
add template=yes group=branch-offices src-address=172.16.0.0/16 dst-address=172.19.0.0/16 proposal=enterprise-proposal

# Configure dynamic routing with OSPF over IPsec
/routing ospf instance
add name=backbone router-id=172.16.0.1

/routing ospf area
add instance=backbone name=backbone area-id=0.0.0.0
Performance Optimization
Hardware Considerations for High-Throughput VPNs
Selecting the right hardware is crucial for VPN performance:
| MikroTik Model | Approximate IPsec Throughput | Recommended Use Case |
|---|---|---|
| hEX (RB750Gr3) | ~100 Mbps | Small branch offices (up to 10 users) |
| RB4011 | ~450 Mbps | Medium branch offices (10-50 users) |
| CCR1009 | ~900 Mbps | Large branch offices (50-100 users) |
| CCR1036 | ~1.5 Gbps | Headquarters/data centers (100+ users) |
| CCR2004/CCR2116 | ~2.5+ Gbps | High-performance data centers |
FastTrack Implementation for VPN Traffic
Configure FastTrack to accelerate VPN traffic:
# Enable fasttrack for established/related connections
/ip firewall filter
add chain=forward action=fasttrack-connection connection-state=established,related comment="FastTrack established connections"
add chain=forward action=accept connection-state=established,related comment="Accept established connections"
MTU Optimization Techniques
Proper MTU configuration prevents fragmentation and improves performance:
# Determine optimal MTU (account for IPsec overhead)
/ip firewall mangle
add chain=forward action=change-mss new-mss=1350 protocol=tcp tcp-flags=syn tcp-mss=!0-1350 \
    ipsec-policy=ipsec out-interface=ether2
To test optimal MTU size:
# Disable ICMP blocking first
/ip firewall filter
add chain=forward protocol=icmp action=accept

# Then use ping with Don't Fragment flag to find maximum size
ping 192.168.2.1 size=1500 do-not-fragment
CPU Utilization Management
Monitor and manage CPU resources for optimal VPN performance:
# View CPU usage by processes
/system resource cpu print

# Monitor CPU usage during heavy VPN traffic
/tool profile cpu timeout=30
Optimization strategies:
- Distribute CPU load across multiple cores for encryption
- Use hardware acceleration when available (especially on CCR models)
- Limit concurrent connections when necessary
- Upgrade RouterOS to benefit from performance improvements
Integration with Existing Infrastructure
Active Directory/RADIUS Authentication
Integrate your VPN with centralized authentication services:
# Configure RADIUS client on MikroTik
/radius
add service=ipsec address=10.1.1.100 secret="RadiusSecret123" comment="Domain Controller"

# Configure IPsec to use RADIUS
/ip ipsec settings set accounting=yes

# For L2TP/IPsec, configure PPP to use RADIUS
/ppp profile set default use-radius=yes
Monitoring System Integration
Configure SNMP for integration with monitoring platforms:
# Enable and configure SNMP
/snmp community
add name=monitor address=10.1.1.200/32 read-access=yes

/snmp
set enabled=yes contact="Network Admin" location="Main Office" trap-community=monitor trap-version=2
For syslog integration:
/system logging action
add name=remote target=remote remote=10.1.1.201 remote-port=514

/system logging
add topics=ipsec,info action=remote
add topics=system,info action=remote
Automation and Scripting Possibilities
MikroTik’s scripting capabilities allow for powerful automation:
# Script to check VPN status and restart if down
/system script
add name=check-vpn-status source="\
:local peer [/ip ipsec peer get [find name=\"to-office-b\"] address];\
:local result [/ping \$peer count=3];\
:if (\$result = 0) do={\
    /log warning \"VPN peer unreachable, restarting tunnel\";\
    /ip ipsec peer disable [find name=\"to-office-b\"];\
    :delay 5s;\
    /ip ipsec peer enable [find name=\"to-office-b\"];\
}"

# Schedule the script to run every 5 minutes
/system scheduler
add name=vpn-monitor interval=5m on-event=check-vpn-status start-time=startup
Configuration Backup Strategies
Implement regular configuration backups for disaster recovery:
# Create and email a backup file daily
/system script
add name=backup-config source="\
:local date [/system clock get date];\
:local time [/system clock get time];\
:local name \"backup-\$date-\$time\";\
/system backup save name=\$name;\
/tool e-mail send to=\"admin@example.com\" subject=\"Router Backup \$name\" \
file=\"\$name.backup\" body=\"Automatic backup attached.\";"

# Schedule daily backups
/system scheduler
add name=daily-backup interval=1d on-event=backup-config start-time=02:00:00
Conclusion
MikroTik routers provide a powerful, cost-effective platform for implementing secure and reliable site-to-site VPNs for businesses of all sizes
Check our list of MikroTik guides.