MikroTik Router Setup from Scratch: Default Config, First Login, and Secure Baseline
Setting up a MikroTik router for the first time is straightforward when you understand what the factory configuration already does. Most home and small-office models arrive with a working baseline: a LAN bridge, DHCP for local devices, a WAN-facing port, basic source NAT, and firewall rules intended to protect the router from unsolicited internet traffic. Your first job is usually to log in, set secure credentials, confirm the WAN and LAN roles, update RouterOS, and save a known-good backup—not to erase everything and start over.
This guide walks through a safe first-time MikroTik router setup using RouterOS 7. It covers the default configuration, first login with WinBox or WebFig, initial internet checks, a secure baseline, and the point at which a manual configuration is appropriate. Menu names and port roles can vary by model, so use the device label and its Quick Guide when they differ from the examples below.
Quick-start checklist
- Identify the router model, power supply, port labels, and factory password on the device sticker or packaging.
- Connect your computer to a LAN port (commonly any Ethernet port except
ether1) and connect the ISP handoff to the port designated as WAN. - Open WinBox and connect using the router’s MAC address if its IP address is not yet reachable.
- Log in with the credentials supplied for that exact device; change the password immediately.
- Keep the default configuration unless you specifically need a clean manual build.
- Check WAN connectivity, DHCP, DNS, and Wi-Fi (if fitted).
- Update RouterOS and firmware where appropriate, harden management access, and save a backup.
1. Before you power on the router
Gather the essentials before changing settings:
- The router and correct power supply: check the model’s voltage and power requirements. Do not assume every MikroTik device uses the same adapter or PoE arrangement.
- An Ethernet cable and a computer: wired access is preferable for the initial setup because it avoids Wi-Fi association and addressing issues.
- Your ISP connection details: find out whether the WAN uses DHCP, PPPoE credentials, a static IP address, VLAN tagging, or another access method. Many residential connections use DHCP, but this is not universal.
- Factory credentials: check the label on the router and the supplied documentation. Newer devices commonly have a unique password printed on the device; older models may use the historical
adminaccount with a blank password. Do not assume one credential scheme applies to every model. - A basic addressing plan: note the LAN subnet you want to use and whether it conflicts with an existing modem, upstream router, or VPN network.
For the official model-specific connection procedure, see MikroTik’s RouterOS Getting Started documentation.
2. Understand the MikroTik default configuration
The default configuration is not identical across every RouterBOARD, hAP, Chateau, CCR, switch, or access-point model. RouterOS applies a profile appropriate to the device’s intended role. A typical home or small-office router configuration may include:
- A bridge that groups LAN Ethernet ports and, on wireless models, the Wi-Fi interfaces.
- A LAN IP address, often
192.168.88.1/24on common AP-router defaults. - A DHCP server that assigns addresses to LAN clients.
- A DHCP client or another WAN configuration on the internet-facing interface.
- A source NAT masquerade rule so LAN clients can share the WAN connection.
- Firewall filter rules that allow established and related traffic, permit appropriate LAN access, and block unsolicited input from the WAN.
- Wireless security and SSID settings on devices with built-in Wi-Fi.
These are common patterns, not a promise that every device uses the same port map, IP range, or wireless configuration. To inspect the exact factory commands on a device, use:
/system/default-configuration/printImportant: do not choose Remove Configuration simply because you are new to RouterOS. Removing the default configuration also removes its firewall and other baseline settings. A device without a default configuration needs a deliberate replacement for its bridge, IP addressing, DHCP, NAT, and firewall policy before it is safely connected to the internet. MikroTik documents the available profiles in its default configurations reference.
3. Connect to the router for the first login
Make the physical connections
- Connect your computer to a LAN Ethernet port. On many AP-router models this is a port other than
ether1, which is commonly assigned as WAN by the default configuration. - Connect the ISP modem or handoff to the router’s WAN port, following the labels and model Quick Guide.
- Power on the router and allow it to finish booting.
- Set your computer’s Ethernet adapter to obtain an IP address automatically (DHCP), unless your device documentation specifies a different initial method.
Connect with WinBox
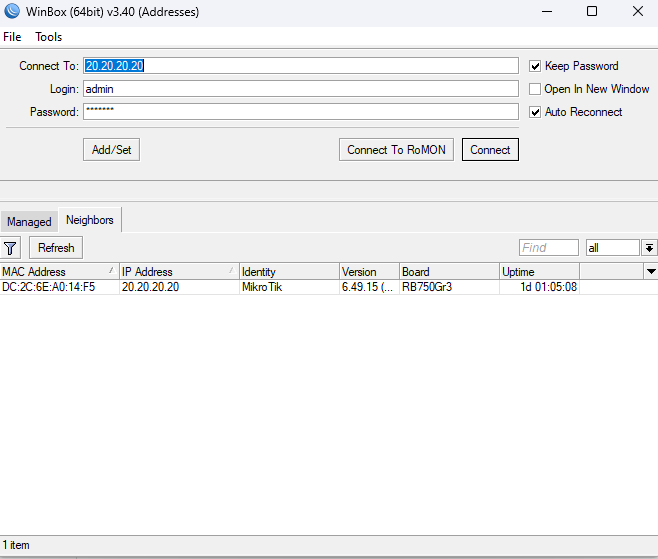
Download WinBox from MikroTik and open it on your computer. The Neighbors tab can discover MikroTik devices on the local Layer 2 network. Select the correct router, then connect using its MAC address if an IP connection is not available. A MAC connection is particularly useful during first access because it does not depend on the computer already having the correct IP subnet.
Enter the username and the device-specific password. On older hardware the username may be admin with no password; on newer hardware, use the unique password printed on the sticker. If you cannot find the password, check the device documentation rather than trying a password copied from a different model.
Alternative: WebFig
If your computer has received an address from the router and can reach its LAN IP, open that address in a browser. The common factory LAN address on many AP-router models is 192.168.88.1, but verify the address for your model. WebFig provides browser-based access to RouterOS settings; WinBox is generally the more convenient tool for initial discovery and ongoing administration.
For a more detailed tour of the two management interfaces, see WinBox and CLI for MikroTik management.
4. Complete the first-login security steps
Once you are logged in, protect the management account before doing optional configuration. A router with an unchanged or blank administrator password is not ready for production.
Set a strong, unique password
Use a password manager to generate a long, unique password. Do not reuse your Wi-Fi password, email password, or credentials from another router. In WinBox, open System → Users, select the account, and set the password. In the CLI, for the currently logged-in user, use:
/user set [find where name="admin"] password="REPLACE-WITH-A-UNIQUE-STRONG-PASSWORD"Replace the placeholder before running the command; never paste an example password from an article into a live router. Be careful with special characters and quoting in RouterOS terminal commands.
Create named administrator accounts
For a managed network, use a named account for each administrator rather than sharing one login. Create accounts with only the permissions they need. A full administrator account is powerful, so reserve it for trusted operators and use a restricted group for monitoring or read-only work. After verifying that your new administrator account works, you can disable the default admin account if it exists and is no longer needed.
/user add name=netadmin group=full password="REPLACE-WITH-A-DIFFERENT-STRONG-PASSWORD"
/user print
Log in with the new account and verify access before disabling or removing any existing account. Never lock yourself out by disabling the only working administrator account.
5. Confirm WAN, LAN, DHCP, and internet access
Do not change several network settings at once. First establish what the router has already configured.
Check the WAN connection
In WinBox, inspect IP → DHCP Client if your ISP supplies an address dynamically. A bound DHCP client and a valid address indicate that this part of the connection is working. If your ISP uses PPPoE, a static address, or a tagged VLAN, follow the ISP’s specific instructions instead of adding a second, conflicting WAN configuration.
Useful CLI checks include:
/interface print
/ip address print
/ip dhcp-client print detail
/ip route print
Look for the expected WAN interface, an assigned address, and a valid default route. A WAN address in a private range or in the carrier-grade NAT range may indicate upstream NAT; it does not necessarily mean the router is misconfigured, but it can affect inbound access.
Check the LAN and DHCP server
Connect a second device to a LAN port. It should receive an address, subnet mask, gateway, and DNS information from DHCP. On the router, inspect:
/ip pool print
/ip dhcp-server print detail
/ip dhcp-server network print
/ip address print
If a client receives no address, verify that its port is part of the LAN bridge, that the DHCP server is enabled on the correct interface, and that no other DHCP server is interfering on the same network.
Test connectivity and DNS separately
From the router terminal, ping a public IP address and then a domain name:
/ping 1.1.1.1 count=4
/ping example.com count=4
If the IP test succeeds but the domain test fails, investigate DNS. If both fail, check the WAN address, default route, upstream modem, ISP authentication, and cabling. Then test from a LAN client. A router having internet access does not by itself prove that LAN clients have working DHCP, DNS, and NAT.
6. Set up Wi-Fi on wireless models
If your MikroTik has built-in wireless, verify the factory SSID and security settings before handing the network to users. Change any default or easily guessable wireless passphrase to a strong, unique one. Choose the correct regulatory country and comply with local channel and transmit-power rules.
RouterOS 7 devices do not all use the same wireless menu. Newer models may use the /interface wifi configuration, while some devices and older installations use the legacy /interface wireless package. Do not paste commands for one wireless stack into a device that uses the other. Confirm the installed package and available menu paths first:
/interface wifi print
/interface wireless print
One of these menus may not exist on your device. That is normal. For advanced wireless planning, consult the official RouterOS wireless documentation and the specific guide for your model.
7. Update RouterOS and RouterBOARD firmware
Before relying on a new router, check for a current maintenance release. In WinBox, open System → Packages → Check for Updates, select the appropriate release channel, and follow the upgrade process. The stable channel is a common choice for production installations; choose a different channel only when you understand its release policy and have a reason to do so.
Before upgrading, save a backup and make sure you have a reliable power source and a way to reconnect if the router reboots. After RouterOS packages are updated and the router has restarted, check the RouterBOARD firmware status:
/system routerboard print
/system routerboard upgrade
The upgrade command stages the available RouterBOARD firmware. Reboot when appropriate to complete the firmware update, then verify the current and upgrade firmware versions. Follow the release notes and model-specific guidance, especially on devices with special boot or storage requirements.
8. Apply a secure RouterOS baseline
The factory firewall is an important starting point. Preserve it unless you are replacing it with an equally deliberate policy. The following hardening steps are suitable for review on a typical router, but confirm that each service is not required by your management workflow before disabling it.
Keep management off the public internet
Do not expose WinBox, SSH, WebFig, API, or other router management services directly to the internet. The default firewall normally blocks unsolicited WAN access to the router itself. If remote administration is needed, use a VPN such as WireGuard or IPsec and allow management only from trusted VPN or LAN addresses.
Disable management services you do not use
Review the enabled services:
/ip service printFor a device that does not require Telnet, FTP, HTTP WebFig, or the API, you can disable those services:
/ip service
set [find name=telnet] disabled=yes
set [find name=ftp] disabled=yes
set [find name=www] disabled=yes
set [find name=api] disabled=yes
Do not disable the only service you are currently using to manage the router. If you use HTTPS WebFig, API-SSL, SSH, or WinBox, decide whether it is needed and restrict its allowed source addresses where appropriate. Service restrictions are an additional control; they do not replace firewall policy.
Restrict Layer 2 management and discovery
MAC-based management and neighbor discovery are convenient during initial setup, but on a production network they should be limited to trusted interfaces. If you manage the router only from the LAN, consider restricting MAC server and neighbor discovery to the LAN interface list. Confirm your actual interface-list names before applying these commands:
/tool mac-server set allowed-interface-list=LAN
/tool mac-server mac-winbox set allowed-interface-list=LAN
/ip neighbor discovery-settings set discover-interface-list=LAN
Do not set these lists to none until you have verified an alternative management path; doing so can remove the discovery and MAC-access method you are currently using.
Review DNS, UPnP, and unused features
If LAN clients use the MikroTik as their DNS resolver, allow-remote-requests=yes may be required. In that case, make sure the input firewall permits DNS only from trusted LAN networks and blocks it from WAN. If the router does not provide DNS service to clients, consider disabling remote requests:
/ip dns print
/ip dns set allow-remote-requests=no
Review UPnP and other optional services. Disable them if your network does not need them:
/ip upnp print
/ip upnp set enabled=no
Also review unused interfaces, bandwidth testing services, cloud features, and any additional packages or services installed on the device. Make changes one at a time and verify that normal network operation continues.
Check firewall rules before adding your own
Inspect the input and forward filter chains and confirm that unsolicited traffic from the WAN is blocked. Do not append a generic drop rule or replace the firewall with a copied ruleset without understanding rule order and the current management path. MikroTik’s Securing Your Router guide explains the recommended baseline, including service restrictions, MAC access, discovery, and firewall protection.
9. Save a backup and an export of the baseline
Once the router is reachable, updated, and secured, save both a binary backup and a text export. The binary backup is useful for restoring the same device or a closely matching environment; the text export is easier to inspect and adapt, but it is not a substitute for a full backup.
/system backup save name=first-login-baseline
/export file=first-login-baseline
Download both files from Files in WinBox and store them securely off the router. Treat backup files as sensitive: they may contain network topology, usernames, addresses, and other configuration details. Protect them with appropriate access controls and encryption at rest. For a password-protected binary backup, specify a strong backup password when saving:
/system backup save name=first-login-baseline password="REPLACE-WITH-A-UNIQUE-BACKUP-PASSWORD"Keep a copy of the device model, serial/asset record, RouterOS version, WAN type, LAN subnet, and date alongside the backup. See our guide to backing up and restoring MikroTik configurations.
10. When should you remove the default configuration?
A clean configuration can be appropriate for advanced deployments such as a custom firewall appliance, a routed core, a complex VLAN design, or a lab where every interface and rule is intentionally built. It is not a required step for a normal first-time home or small-office setup.
If you choose a no-defaults configuration, first prepare and validate a complete replacement plan that includes:
- Management access and administrator recovery.
- Bridge or routed interface design and interface roles.
- LAN addressing, DHCP, and DNS policy.
- WAN addressing, routing, and upstream authentication.
- Source NAT where IPv4 internet access requires it.
- Input and forward firewall rules, including an explicit management policy.
- Wireless security and regulatory settings, if applicable.
- Backup, rollback, and out-of-band recovery access.
The reset command is destructive to the current configuration. For example, /system reset-configuration no-defaults=yes clears the configuration and does not load the factory defaults. Do not run it on a production router as a troubleshooting shortcut. If you need to reset a device, read the official configuration management and reset documentation first, and make sure you have a backup and physical access.
11. First-setup troubleshooting
- WinBox does not discover the router: check power and link lights, connect directly to a LAN port, temporarily disable other active network adapters or VPNs on the computer, and confirm WinBox is on the same Layer 2 segment. Try the model’s documented reset procedure only if you are prepared to lose the current configuration.
- The router appears in Neighbors but login fails: verify the exact username and device-specific password on the label. Check for keyboard layout issues and do not assume an older default password applies.
- The computer receives no IP address: verify the LAN port belongs to the bridge and the DHCP server is enabled on the LAN bridge. Check for a static IP or another DHCP server on the computer’s network.
- The router has no internet access: verify the ISP handoff, WAN port, DHCP/PPPoE/static settings, default route, and any required VLAN tag or modem bridge mode.
- The router can ping the internet but LAN devices cannot: check LAN DHCP and DNS settings, the source NAT rule, and the forward firewall chain.
- You lose access after a security change: reconnect from the intended trusted LAN or console path. This is why changes should be staged and a recovery method preserved.
For broader diagnostics, see common MikroTik troubleshooting techniques.
Frequently asked questions
What is the default IP address of a MikroTik router?
Many MikroTik AP-router defaults use 192.168.88.1 on the LAN, but this is not universal. Some devices have a different role or a minimal configuration. WinBox neighbor discovery and the model documentation can help you identify the correct access method.
What is the default MikroTik username and password?
It depends on the model and production generation. Older devices may use admin with a blank password, while newer devices commonly have a unique password printed on the device label or packaging. Always check the sticker and official documentation for the specific unit.
Should I remove the default configuration?
Usually not for a first home or small-office setup. The default configuration often provides basic LAN, DHCP, NAT, and firewall protection. Remove it only when you have a tested replacement configuration and a recovery plan.
Can I configure a MikroTik router without WinBox?
Yes. RouterOS can be managed with WebFig, the CLI, and supported mobile tools. WinBox is especially useful for first access because it can discover a router by MAC address on the local network.
How do I make a MikroTik router secure after first login?
Set unique administrator credentials, keep the default firewall unless replacing it deliberately, keep management services off the WAN, restrict MAC management and discovery to trusted interfaces, disable unused services, update RouterOS, and save protected backups.
Do all MikroTik routers use ether1 as WAN?
No. ether1 is commonly the WAN port on many AP-router factory configurations, but device roles and default port assignments differ. Check the labels, model Quick Guide, and actual interface configuration.
Conclusion
A safe MikroTik first-time setup is about understanding the default configuration before changing it. Connect through a trusted LAN port, use the credentials supplied with the device, change the administrator password, verify WAN and LAN services, update RouterOS, restrict management access, and save a protected backup. Keep the factory firewall as your starting point unless you are ready to replace it with a complete and tested policy.
Once this baseline is in place, you can move on to more advanced tasks such as VLANs, VPNs, port forwarding, routing, and wireless tuning with a much safer foundation.
Official references
- MikroTik RouterOS: Getting Started
- MikroTik RouterOS: First Time Configuration
- MikroTik RouterOS: Default Configurations
- MikroTik RouterOS: Configuration Management
- MikroTik RouterOS: Securing Your Router
- MikroTik: Official Downloads
Check our list of MikroTik guides